How To Easily Start Garden And Flower Seeds Indoors On The Cheap!

We start all of our ornamental pepper plants indoors. Here are our poinsettia peppers in mid summer bloom.
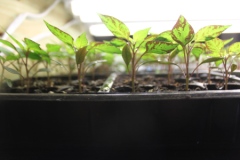
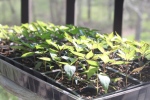
Our Sangria seedlings at the tender age of 4 weeks. The low hanging lights allow them to grow steady and strong.
I think one of the most rewarding experiences for a home gardener is starting their own seeds indoors. For one, it’s an incredibly satisfying feeling to make a tiny seed grow into a beautiful plant for you and your family to enjoy. It also can be a tremendous cash saver – plants can be expensive when purchasing them all at your local greenhouse. Especially if you want to grow specialty or heirloom seeds that are hard to find.
We use a low-cost, simple set up to grow our seedlings indoors. It has allowed us to expand our garden and landscape without breaking the bank.
Let’s start with a few, money saving tips of what you won’t need: Heating Mats and Specialty Lights.
It’s not that heating mats don’t work – they do. They help warm the soil and help to germinate seeds. But unless you live in a 40 degree barn…normal room temperatures will work. It make a take a day or two longer to germinate than if you use heating mats – but the seeds will grow just fine.
There is also no need to waste big money on high-priced “grow lights” or bulbs with a special light spectrum for raising seedlings. They do have a place for certain types of special growing applications – but if your goal is to start and raise seeds indoors – a couple of good old-fashioned inexpensive flourescent “shop lights” work incredibly well. Most of us have a few already around the house. If not, they can be had at your local hardware store for about $10 to $15, and can be used year after year. I am a big believer in the lights. Yes, it’s true that you can use a sunny window of your house – but it’s hard to get seedlings to grow straight using natural winter sunlight from a window. You need to turn them constantly – and the seedlings tend to grow thin and skinny trying to reach up for the light.
What you will need to start up to 4 flats of seeds indoors:
A couple of inexpensive double shop lights are more than enough to grow 4 whole flats of seedlings.
One (1) 32 quart bag of potting soil or seed starter mix. We make our own from equal parts of our compost, sand and soil, but if your starting out, you can buy a good bag for around $10. It will be more than enough to fill four flats and have some left over for next year.
Two (2) inexpensive dual-bulb 4′ flourescent shop lights. (4 bulbs total) You can pick them up at your local hardware store for about $10 – $15 – and most all of them even come with little hooks and a chain for hanging over your plants.
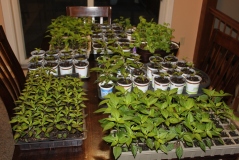
Plants ready to head for the garden and landscape!
Four (4) empty flats with seed tray inserts. (we like the 36 cell plant trays – the individual cells are big enough that you won’t need to transplant the seedling into anything else before they go into the ground)
A few blocks of scrap wood and two 5′ 2×4′s to hang your lights from.
Your seeds of choice. Whatever seeds you use – make sure to label your flats with what you plant in them – it’s easy to get them mixed up as they grow into mature plants. As for when to start your seeds – the back of each seed package will usually tell you the optimum time, however, a general rule of thumb is 6 to 8 weeks before planting outdoors.
The Process:
1. Fill your seed trays with soil mixture — pack lightly – you want the soil to be light and fluffy to allow room for root growth and water filtering through. Moisten the soil –don’t drench. You just want to have the soil wet to the touch – An empty spray bottle of water works great for the first few weeks of starting.

A young seedling emerges from the soil
2. Plant your seeds at a rate of 2 per space – preferably not on top of each other, but in slightly different areas towards the center. Each seed packet will tell you the depth that the seeds should be planted — most are about 1/8″ to 1/4″ inch deep. Planting two seeds ensures that you can get at least one seed to germinate in every space. Yes, you will have to thin later – but better to have too many than none at all! After planting your seeds, lightly moisten the soil again and then cover with a clear plastic sheet or lid and keep out of direct sunlight.
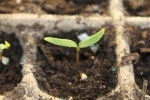
The seedling emerges with two full leaves – now is the time to thin
3. I know it sounds strange to put them out of direct sunlight – but covering them allows moisture to build up and helps to achieve optimum conditions for the seeds to sprout. You will most likely not have to water during this time — just make sure the soil remains moist.
By using clear plastic you can see when the plants actually come up without taking off the cover and disturbing the plants and releasing the moisture.
Young seedling growing into a nice plant
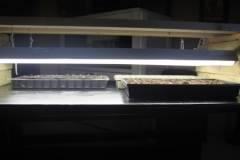
4. Once you see 1-2 seedlings sprouting out of the soil, remove the lid and place onto a table or flat surface. You can now set up your shop lights. You want the lights to hover down about 1 to 2″ from the top of the plants. We do this by putting blocks of wood at each end and running a 5′ 2×4 over all of the flats of seedlings. We then simply screw a little hook into the 2×4′s and hang them with a little hook. (usually included in the shop light kits) When we need to raise the lights as the plants grow – we just add another block of wood to each end. You will want to give your plants about 12 to 14 hours of light each day. (For how to build a cool indoor seed rack stand on the cheap – check out our latest article here : Indoor Plant Rack Stand – On The Cheap)
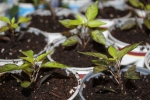
Plants need to be “hardened” off to adjust to real light and temperatures before planting outdoors
You will also need to water more frequently now — most likely once a day – and as the plants grow in the coming weeks – you will continue to adjust those two lights to keep them at 1 to 2″ above the top of the plants. You want the soil to stay moist but not water logged. This is also the time to start thinning to allow for one seed per container. If you have an empty cell, you can replant extra sprouts into the empty cells. We just use a flat head screwdriver to lift out the extra seedling and plant into the empty cell.
The shop lights at such close range keep the seeds growing straight up and at a slower, stronger rate. One of the problems with using just direct sunlight is that the plants will get leggy as they reach to the light source. With the shop lights at such a close range..they grow nice and slow and develop strong roots and leaf structure.
 After about 6 to 8 weeks – your plants will be ready to go. As the weather begins to warm – we will take our plants out onto the back porch to get some regular sun and start adjusting to the temperature and light. One thing to avoid is to take your plants directly from the shop lights and plant them in the yard – you want to give them time to adjust to sunlight and temperature – a process called hardening off. Usually by the end of March – we start to keep them on the porch longer and longer – and near the end – only bring them in or cover them if there is a threat of frost to get them ready for the great outdoors!
- Jim and Mary