Tuesday, July 30, 2013

I learn so much from this website...

How And Why To Plant Fruit Trees In The Fall

Nothing beats the taste of fresh picked cherries!
For those of us that love to garden – nothing can beat the quick return of bountiful harvests from the planting of tomatoes, peppers, corn and more each year. However, not to be forgotten are the years and years of fruit harvests that can be provided from a single planting of a few fruit trees to your yard or landscape.
There is something that is so satisfying about planting fruit trees – somehow signifying that you are putting down roots of a more permanent nature.  Fruit trees can be a valuable addition for those that are trying to be more responsible for growing their own food – and requires much less maintenance than an annual garden.
Fall Planting:
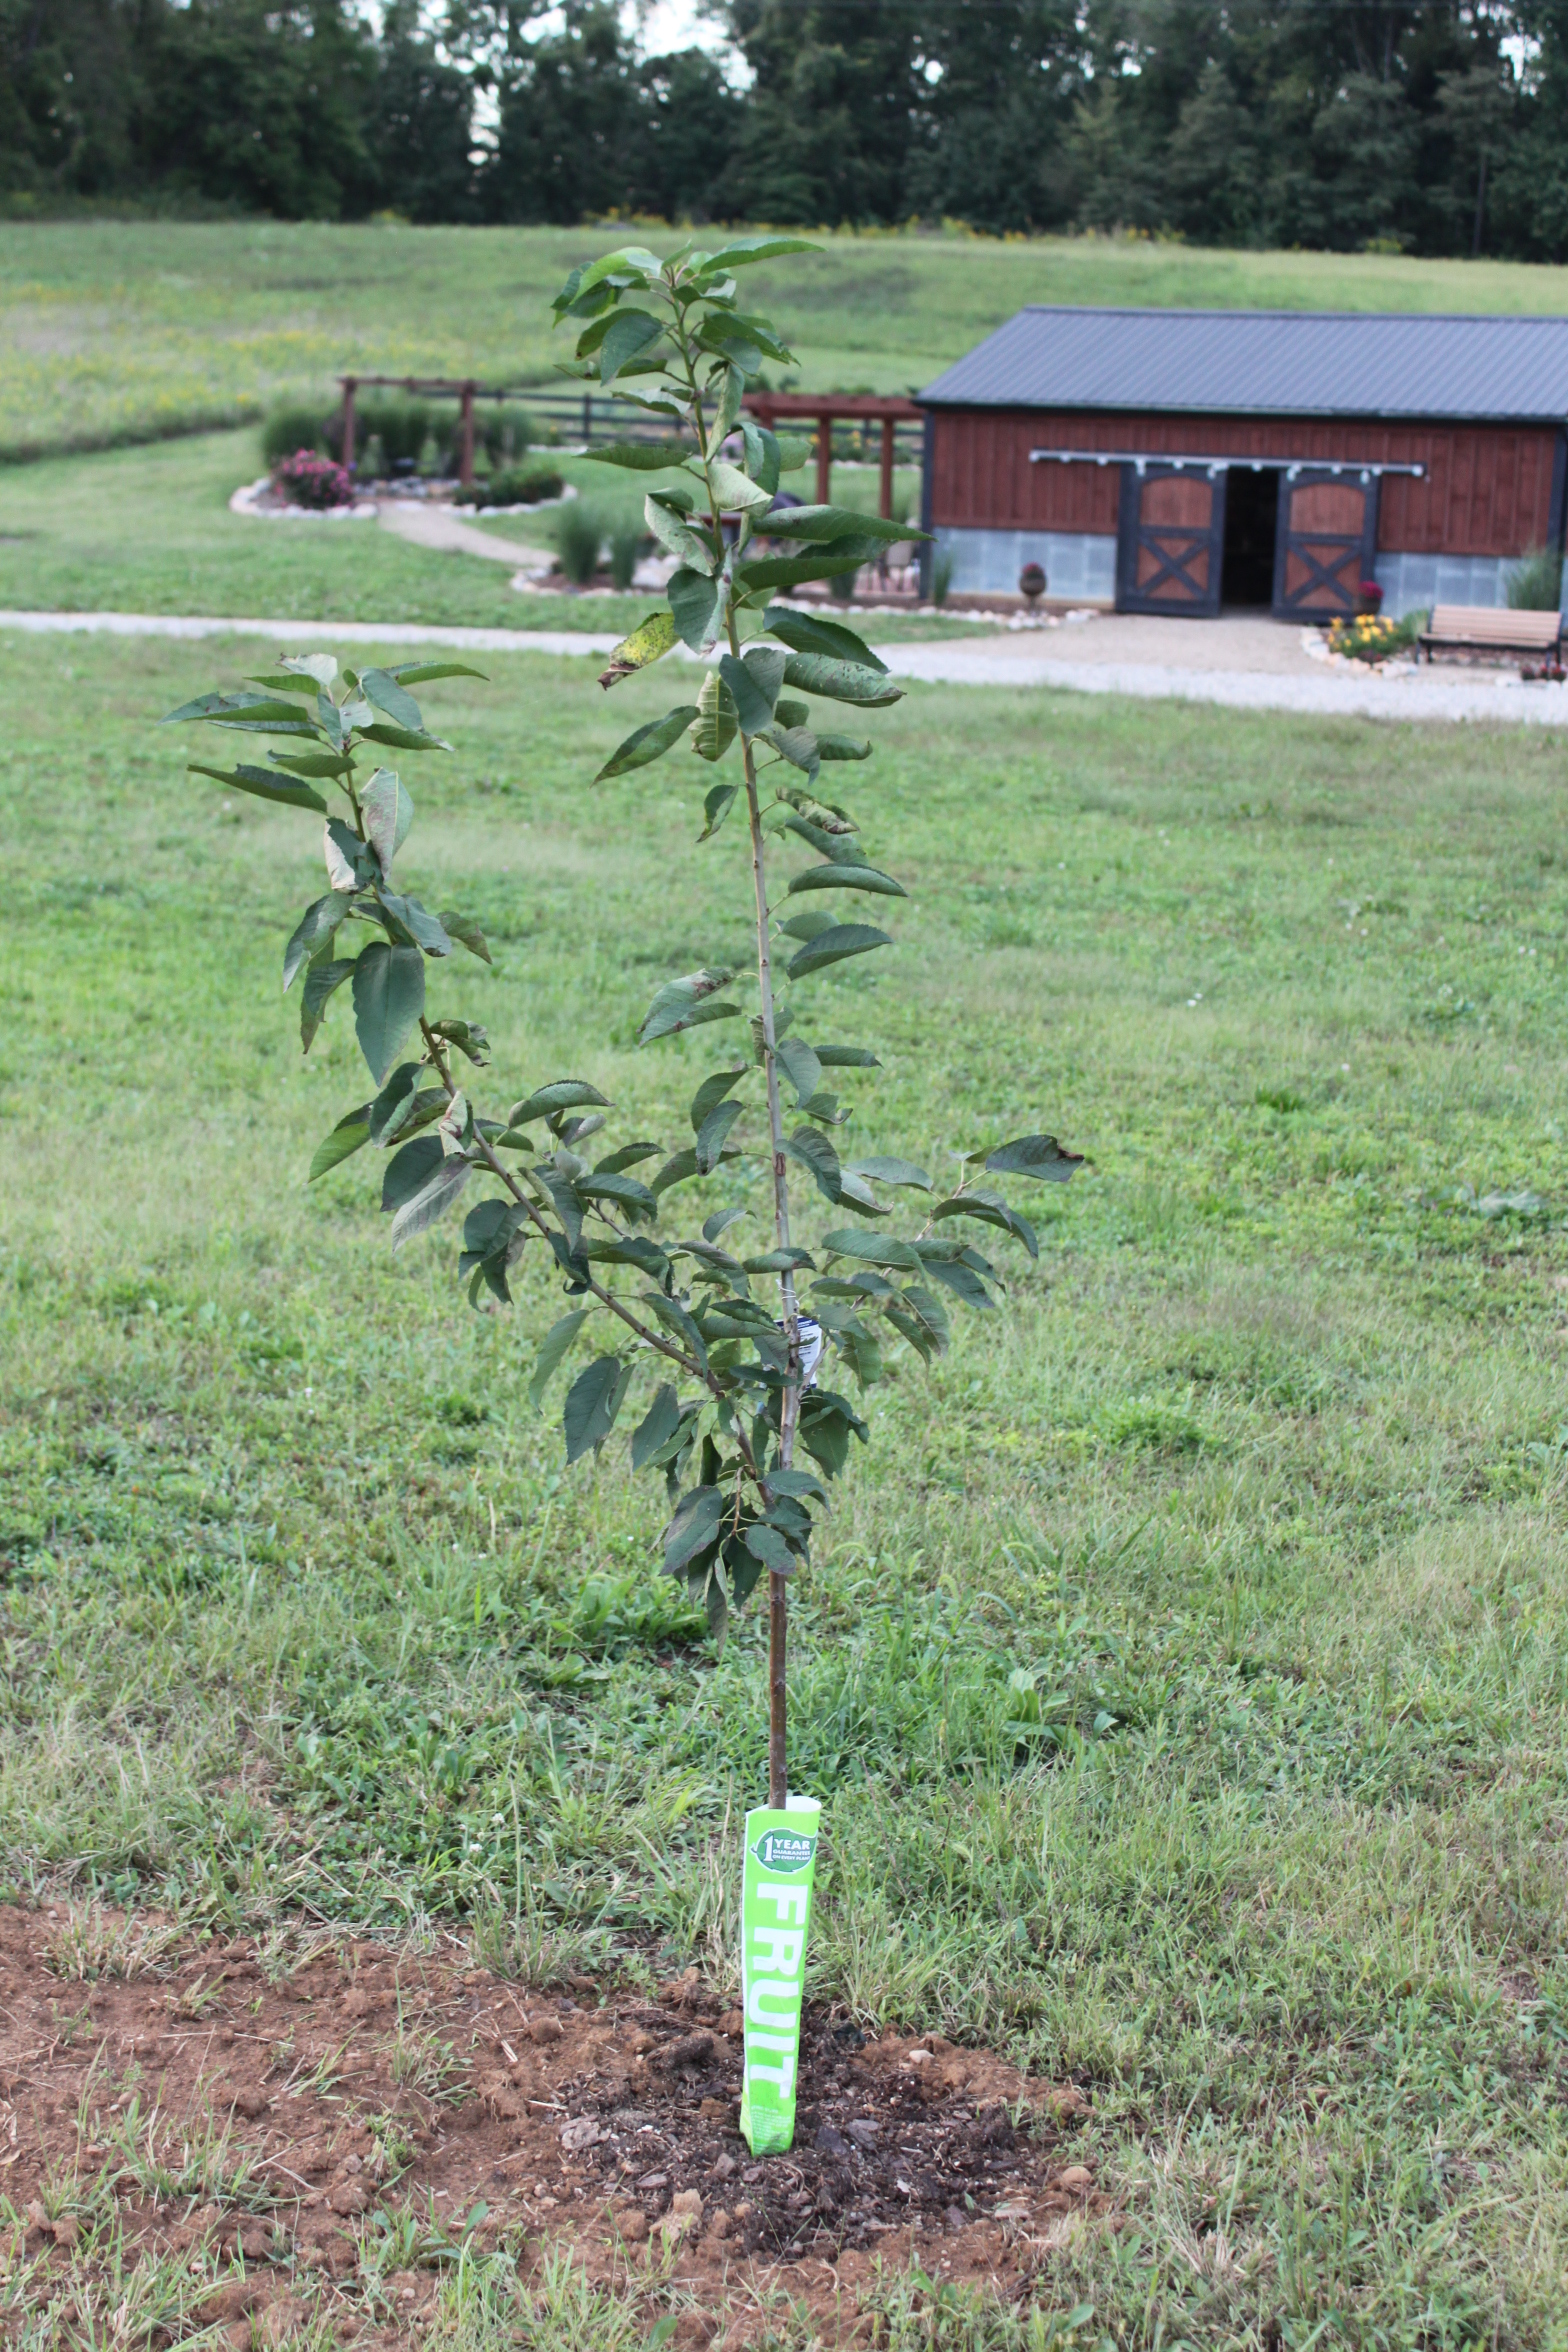
A newly planted apple tree at the farm
Although you can plant fruit trees into your landscape at any point of the growing season – fall is really the best time to plant.
The advantages to planting your trees in the fall are many.  For one, the cooler temperatures are much less stressful on the trees and require far less watering than planting trees in the spring and taking them through the hot summer months.
Fall planting allows just enough time for the roots of a tree to become established – getting them accustomed to the soil and preparing them for fast growth the following spring.
Choosing Your Trees:
Whether you would like to grow your own cherry, pear, or apple trees –  take care when you select your fruit trees.  Make sure you select varieties that are hardy and tolerant to your growing zone.  In addition, most fruit trees require a second pollinator to insure that the trees will bear fruit.
Freshly peeled apples being prepared for making fresh apple butter
For example – let’s say you like the Fuji apple variety.  If you plant a single Fuji apple tree – you may be sad to find out you will never enjoy the tasty apples that so many of us love. That’s because the Fuji is a self sterile variety – and requires a second pollinator to fruit.  So in order to have Fuji apples – you will need to plant a partner tree such as Gala or Granny Smith variety as well.
It may sound a bit daunting at first between selecting tolerant and partner friendly varieties – but almost all nurseries have easy to read pollination charts that can walk you through the process.  And of course – don’t be afraid to ask questions – most nurseries worth their salt will have someone on staff that can guide you through the process.
TIPS TO PLANTING:
Planting a fruit tree is actually a very simple process.
As with your garden - mixing in compost in your planting hole is a great way to get your trees off to a good start!
As with your garden – mixing in compost in your planting hole is a great way to get your trees off to a good start!
Dig your planting hole about two to three times the diameter – and about 1 1/2 times the depth of the container that your tree came in.  Once your hole is dug – mix back in equal amounts of compost and soil to the bottom of the hole, filling it up enough so that the top of the tree’s root ball sits about and inch or so above the top of the hole. At this point, water the root ball generously (a few gallons) – and then fill in around the rest of the hole with equal amounts of compost and soil.  When your tree is completely planted – you want the base of the trunk to be just above ground level – allowing for good drainage.  Apply a 2 to 3″ layer of mulch (shredded hardwood mulch, straw, or shredded leaves work well) to help the tree retain moisture and protect the root ball from winter.  That’s it!
Can anything be better than a fresh fruit pie?!
You will want to water your trees for the remainder of fall – applying a few gallons around the root zone when mother nature doesn’t provide her own.  If your tree is large enough – you may also want to stake it to provide protection from winter winds.
As for spacing – on average most dwarf trees should be planted about 8 to 10 feet apart – and at least 12 feet between rows. For semi-dwarfs 10 to 12 feet apart and 14 to 16 feet between rows, and for full size trees, your best bet is to read the label to make sure you leave adequate growth for specific trees.
With a little work this fall – you can be enjoying your favorite fruits for years to come!
Happy Gardening!  - Jim and Mary

Monday, July 29, 2013

If you are wanting to try some of the basil at Linda's here is a yummy and simple recipe that uses zucchini, fresh basil and cherry tomatoes. So yummy!

Simple Summer Spaghetti
Makes: 4 to 8 servings
Prep 20 minsCook 20 mins

Simple Summer Spaghetti
  • 12ounces dried spaghetti or spaghettini
  • 1/4cup olive oil
  • 5cloves garlic, coarsely chopped (not too tiny or it will burn)
  • Pinch crushed red pepper, or more to taste
  • 2cups cut-up grilled zucchini or summer squash
  • 2cups red and/or yellow cherry tomatoes, quartered
  • 1/4cup fresh basil leaves, torn
  • 1/4 - 1/2cup grated Parmesan cheese
  • 2tablespoons chopped fresh basil and/or Italian parsley

directions
1.Bring a large pot of salted water to boiling. Stir in spaghetti. Cook for 9 to 10 minutes or just until tender. Strain pasta, reserving 1 cup of the cooking water.
2.Meanwhile, in an extra-large skillet combine olive oil, garlic, and crushed red pepper. Cook over medium heat about 3 minutes or until garlic begins to soften; do not let garlic brown. Stir in zucchini, tomatoes, and torn basil. Season with salt and pepper.
3.Reduce heat to low. Stir in reserved cooking water and spaghetti. (If skillet is too small, mix all ingredients the large pot used to cook spaghetti.) Heat through. Sprinkle with Parmesan. Transfer to a large serving bowl. Sprinkle with fresh basil and/or parsley.

Grilled Squash:
  • Cut squash in 1/2-inch lengthwise slices. Brush with olive oil and season with salt and pepper. Grill over medium-high heat, just until barely tender. Remove from grill before squash strips become soft; the squash will continue to cook when combined with spaghetti and sauce. Cut squash into 1/2-inch cubes. (Squash can be grilled, cut, and refrigerated up to 3 days in advance.)

Saturday, July 27, 2013

Hoping for a fall harvest of spring crops...

Planning And Planting A Late Summer Garden – Getting Extra From Your Garden Space This Year!

You can enjoy favorites like snow peas late into the fall with a second late summer planting!
So much emphasis is given every year to getting the garden in throughout the spring and early summer – that sometimes we forget that many crops can be planted again in the late summer.
Almost all of the crops that do well in the cooler seasons of early spring and summer can once again thrive in late summer and fall – giving you a chance to enjoy even more fresh veggies before the proverbial snow starts to fly.
Better yet, with the warmer soil temperatures in late summer – all of the plantings can be done through direct sowing of seeds.  That means for just a few dollars – you can enjoy mounds and mounds of fresh vegetables!
Clearing And Preparing Space In The Garden:
Radishes are a great fall crop - maturing in as little as 18 to 21 days!
Radishes are a great fall crop – maturing in as little as 18 to 21 days!
As many of your early season plants such as peas, cucumbers, zucchini or cabbage are harvested - it is a great time to clear them out and prepare the space for planting a second round of crops.  We simply pull up our expired plants - chop them up and add them into our compost bins.
If you missed planting anything at all early in the year – here is your chance to still have a garden!
Add Some Compost And Rejuvenate Your Soil:
Compost is a great way to rejuvenate the soil for a late summer crop
This is a step that many forget to take when planting successive crops within the same season.  Remember that your soil just spent the last few months giving back some of its nutrients to your first round of crops, so it is important to rejuvenate the soil with a little compost to provide a boost for your fall crop.  We like to work in an inch or two to the soil, and then add a little more into the planting rows when we sow our seeds.
When And What To Plant:
Green onions are another great late season crop
Planting in late summer can keep you in fresh salads late into the year!
Although it is a little late to plant a new round of long maturing crops like corn or tomatoes – late summer can be a great time to get in a few more rounds of your favorite cool weather crops such as sugar snap peas, lettuce, kale, green onions, radishes, carrots and even green beans.
Late summer planting has a lot of advantages over early spring planting for cool loving crops.  For one, the soil is already warm, so your seeds will germinate much faster, without the worries of your seed rotting in the overly cool and sometimes all too wet spring.
Here in Ohio – we start to sow our crops in late July / Early August – allowing the plants to come up through the soil and mature in the cooler temperatures of late August and September.  In many cases, like with our snow peas – we will sow two separate crops about 10 days apart to enjoy two extra crops.
Fall Care:
Clear all of your debris from the garden before winter - and plant a cover crop like annual rye to build back nutrients and keep back weeds!
Clear all of plant debris from the garden before winter – and plant a cover crop like annual rye to build back nutrients and keep back weeds next year!
It is important, as it is with all crops, to make sure to remove all the plants and foliage from the garden once your late season crops are finished.  Why? Allowing any of your vegetable plant material to over-winter is an open invitation to insects, pests and plant diseases to become established in your garden and soil.  So make sure to clear that space!  Better yet – once those garden crops are complete – sow in a great fall cover crop (See How To Plant Cover Crops) to rejuvenate that soil for a great garden next year!
So get planning and planting on those fall seed crops now – and you will be rewarded with some in-season fall vegetables to enjoy!
Happy Gardening – Jim and Mary

Friday, July 26, 2013

Basil, Basil ...we have lots of basil (at Linda Shattuck's house for garden members)...

How To Preserve Your Basil – Including A Basil Pesto Recipe

Now that you have all that basil, it is time to use and preserve it.
Basil is one of the easiest herbs to grow, and it can quickly can become large and out of control. If you planted basil this spring, I am sure that you have personally witnessed it’s immense growth and aroma.  Now, what to do with it all?
Even our potted basil on the back deck has taken off.  This is even after several cuttings.
Even our potted basil on the back deck has taken off. This is even after several cuttings.
The absolute best way to preserve both the flavor and color of basil is to make Pesto, a common Italian sauce made with fresh basil, garlic, olive oil and pine nuts. Pesto freezes well and allows basil to keep much fresher than any other preservation method.
Basil gets its flavor from some very volatile aroma compounds that are easily lost, so you need to be gentle as you work with it. Don’t even think about drying the basil; it will lose all of its flavor and you’ll be stuck with some crumbling, flavorless leaves.  After you make your pesto, and you still have several sprigs of basil left, here are some other ways to maximize the use and preserve your basil for use later in the year.
1. Make sure to cut your basil before it goes to seed – this will ensure that you receive the maximum flavor from each leaf.
Basil cut and placed in a vase of water....it started rooting after a week, but the leaves are still good to use.
Basil cut and placed in a vase of water….it started rooting after a week, but the leaves are still good to use.
2. If you aren’t quite ready to use the basil but need to cut it down, cut each stem leaving at least 2 pairs of leaves per stem.  Place the stem in lukewarm water without submerging the leaves. Use within one week.
3. Chop a leaf or two and place them in a section of an ice cube tray and fill with water.  Freeze, remove and store in an air tight container.
4. Spread whole leaves of basil on a sheet of waxed paper.  Lightly oil the front and back of each leaf with olive oil.   Roll the spread out leaves in the wax paper.  Freeze in a freezer bag.
5. Freeze pesto in lightly oiled ice cube trays – once frozen, remove and store in an air tight container or jar in your freezer.
Of course, besides making basil pesto, add basil to any tomato dish for a classic flavor.  Here is a recipe that we posted a while back Tomato and Basil Chicken Pasta that you might enjoy.  And our personal favorite – add basil to a slice of a tomato topped with fresh mozzarella cheese,then add a drizzle of olive oil for a fresh summer appetizer.  Just don’t let your basil go to waste – you will be craving it on those cold winter days.

TRADITIONAL BASIL PESTO RECIPE

Ingredients:
Making pesto is quick and easy using a food processor.
2 cups fresh basil leaves, packed
1/2 cup freshly grated Pecorino-Romano (or Parmesan-Reggiano) cheese
1/2 cup extra virgin olive oil
1/3 cup pine nuts or walnuts
3 medium sized garlic cloves, peeled
Salt and freshly ground black pepper to taste
Instructions:
Pesto made with fresh basil and ready to be used or frozen.
1. Place the basil  and the pine nuts in a food processor.  Pulse a few times.  (If you are using walnuts instead of pine nuts and they are not already chopped, pulse them a few times first, before adding the basil.)
2. Add the garlic, pulse a few times more.
3.  Slowly add the olive oil in a constant stream while the food processor is on. Stop to scrape down the sides of the food processor with a rubber spatula.
*If you are going to freeze the pesto – stop here.  Pesto freezes better without the cheese added.  If you are not going to freeze, or once you have thawed your pesto, proceed to step 4.
4. Add the grated cheese and pulse again until blended. Add a pinch of salt and freshly ground black pepper to taste.
Add to pasta, potatoes, and chicken dishes, or serve over toasted baguette slices.
Enjoy!
Mary and Jim

Tuesday, July 23, 2013

Here is another...
Sauteed Zucchini, Peppers and Tomatoes

1 pound( about 2 medium) zucchini
2 yellow bell peppers ( I used green peppers from our garden)
2 tablespoons olive oil
1 pint grape tomatoes ( I used the yellow/orange ones from our garden)
2 cloves garlic, smashed
coarse salt and ground pepper
Step 1
Quarter zucchini lengthwise; cut crosswise into 1/2 inch thick pieces. Remove ribs and seeds from peppers;cut into 3/4 inch squares.
Step 2
Heat olive oil in a large skillet over medium heat. Add zucchini,peppers,tomatoes, and garlic;season with salt and pepper. Cook,tossing frequently,until vegetables are crisp-tender,6 to 8 minutes.


Sauteed Zucchini, Peppers, and Tomatoes
Here are a few recipes for things that we are getting in our baskets...


Sauteed Swiss Chard Ribs with Cream and Pasta Recipe

  • 2 cups of chopped chard
  • 1/4 cup of butter
  • 3/4 to 1 cup of heavy cream
  • Salt and Pepper
Enough dry pasta to make about 1 quart of cooked pasta. Wash and cut the ribs into 1/2 inch pieces. Blanch the chard in lightly salted boiling water for 3 minutes. Melt butter over med heat. Add the drained, blanched chard and simmer for 4 minutes. Add cream and cook until cream reduces by about two–thirds In the meantime, cook your pasta. When finished, mix the creamed chard with pasta. Season lightly with salt and pepper.

Eggplant Parmesan

  • 2 small eggplant (peeled or not) cut into 1/4" rounds
  • 2 eggs lightly beaten
  • 1 1/2 cups bread crumbs
  • 1/2 teaspoon salt
  • 1/4 teaspoon pepper
  • 1 clove garlic peeled & halved
  • 3/4 cup olive oil
  • 2 1/2 cups tomatoes
  • 1/3 cup tomato paste
  • 2 Tablespoons chopped basil
  • 1 teaspoon salt
  • 1/4 teaspoon pepper
  • 1 cup grated parmesan cheese
  • 1/2 pound mozz cheese, sliced
Mix 1/2 the salt and pepper in bread crumbs
Dip eggplant in egg then in bread crumbs. Refrigerate for 20 minutes
In large pan, saute garlic in 2 Tablespoons olive oil for 2 minutes. Remove garlic, add tomatoes, tomato paste, basil, salt and peppers. Cover and simmer for 30 minutes. Preheat oven to 350 degrees. Brown eggplant in 1/4� of oil. Drain on paper towels.
Put a thin layer of tomato sauce in a baking pan and layer eggplant, sauce, parmesan, and mozzarella alternately. End with mozzarella on top. Bake uncovered for 30 minutes.

Penne with Summer Squash

  • 1 lb. dry penne pasta, preferably whole-wheat
  • 1 1/2 tsp. finely grated lemon peel
  • 1/4 cup olive oil, preferably extra-virgin
  • 1/2 tsp. salt
  • 3 medium cloves garlic, minced
  • 1/2 tsp. freshly ground pepper
  • 2 large shallots, finely chopped
  • 1/2 cup finely shredded fresh basil
  • 4 small zucchini (1 lb.), very thinly sliced
  • 1/3 cup chopped fresh chives
  • 8 oz. small pattypan squash, quartered (2 cups)
  • 1/2 cup shaved fresh Parmesan cheese
Bring large pot of water to a boil. Add penne and stir to prevent sticking. Cook until just tender, about 10 minutes. Meanwhile, in large deep skillet, heat oil over medium heat. Add garlic and shallots and cook, stirring, until lightly browned, 2 minutes. Add zucchini and squash and cook, stirring occasionally, until tender and golden at edges, about 6 minutes. Drain penne, reserving 1 cup cooking water. Stir lemon peel, salt, pepper and reserved cooking water into squash mixture. Transfer penne to large serving bowl. Add squash mixture, basil and chives and toss to combine. Sprinkle with Parmesan cheese and serve hot. Serves 6.

Wednesday, July 10, 2013

Community Garden Pictures!

Here are some updated pictures of the community garden - Wheatley garden.  I hope to get pictures of the other gardens up soon. 


Sweet Potatoes for next year's garden


The corn "jumped" while we were on vacation -- holy cow!


Beautiful zinnias -- thanks, Kim, for making the garden beautiful!


Pumpkins -- they didn't all take, but the ones that did are looking "fine"


Hot Peppers


Sweet Peppers
 

YEH-- BEAUTIFUL TOMATOES!