Friday, October 25, 2013

The garden may be finished for the year but that doesn't mean we have to be through canning....this is SIMPLE!

Simple Homemade Chicken or Vegetable Stock Recipe – Can or Freeze

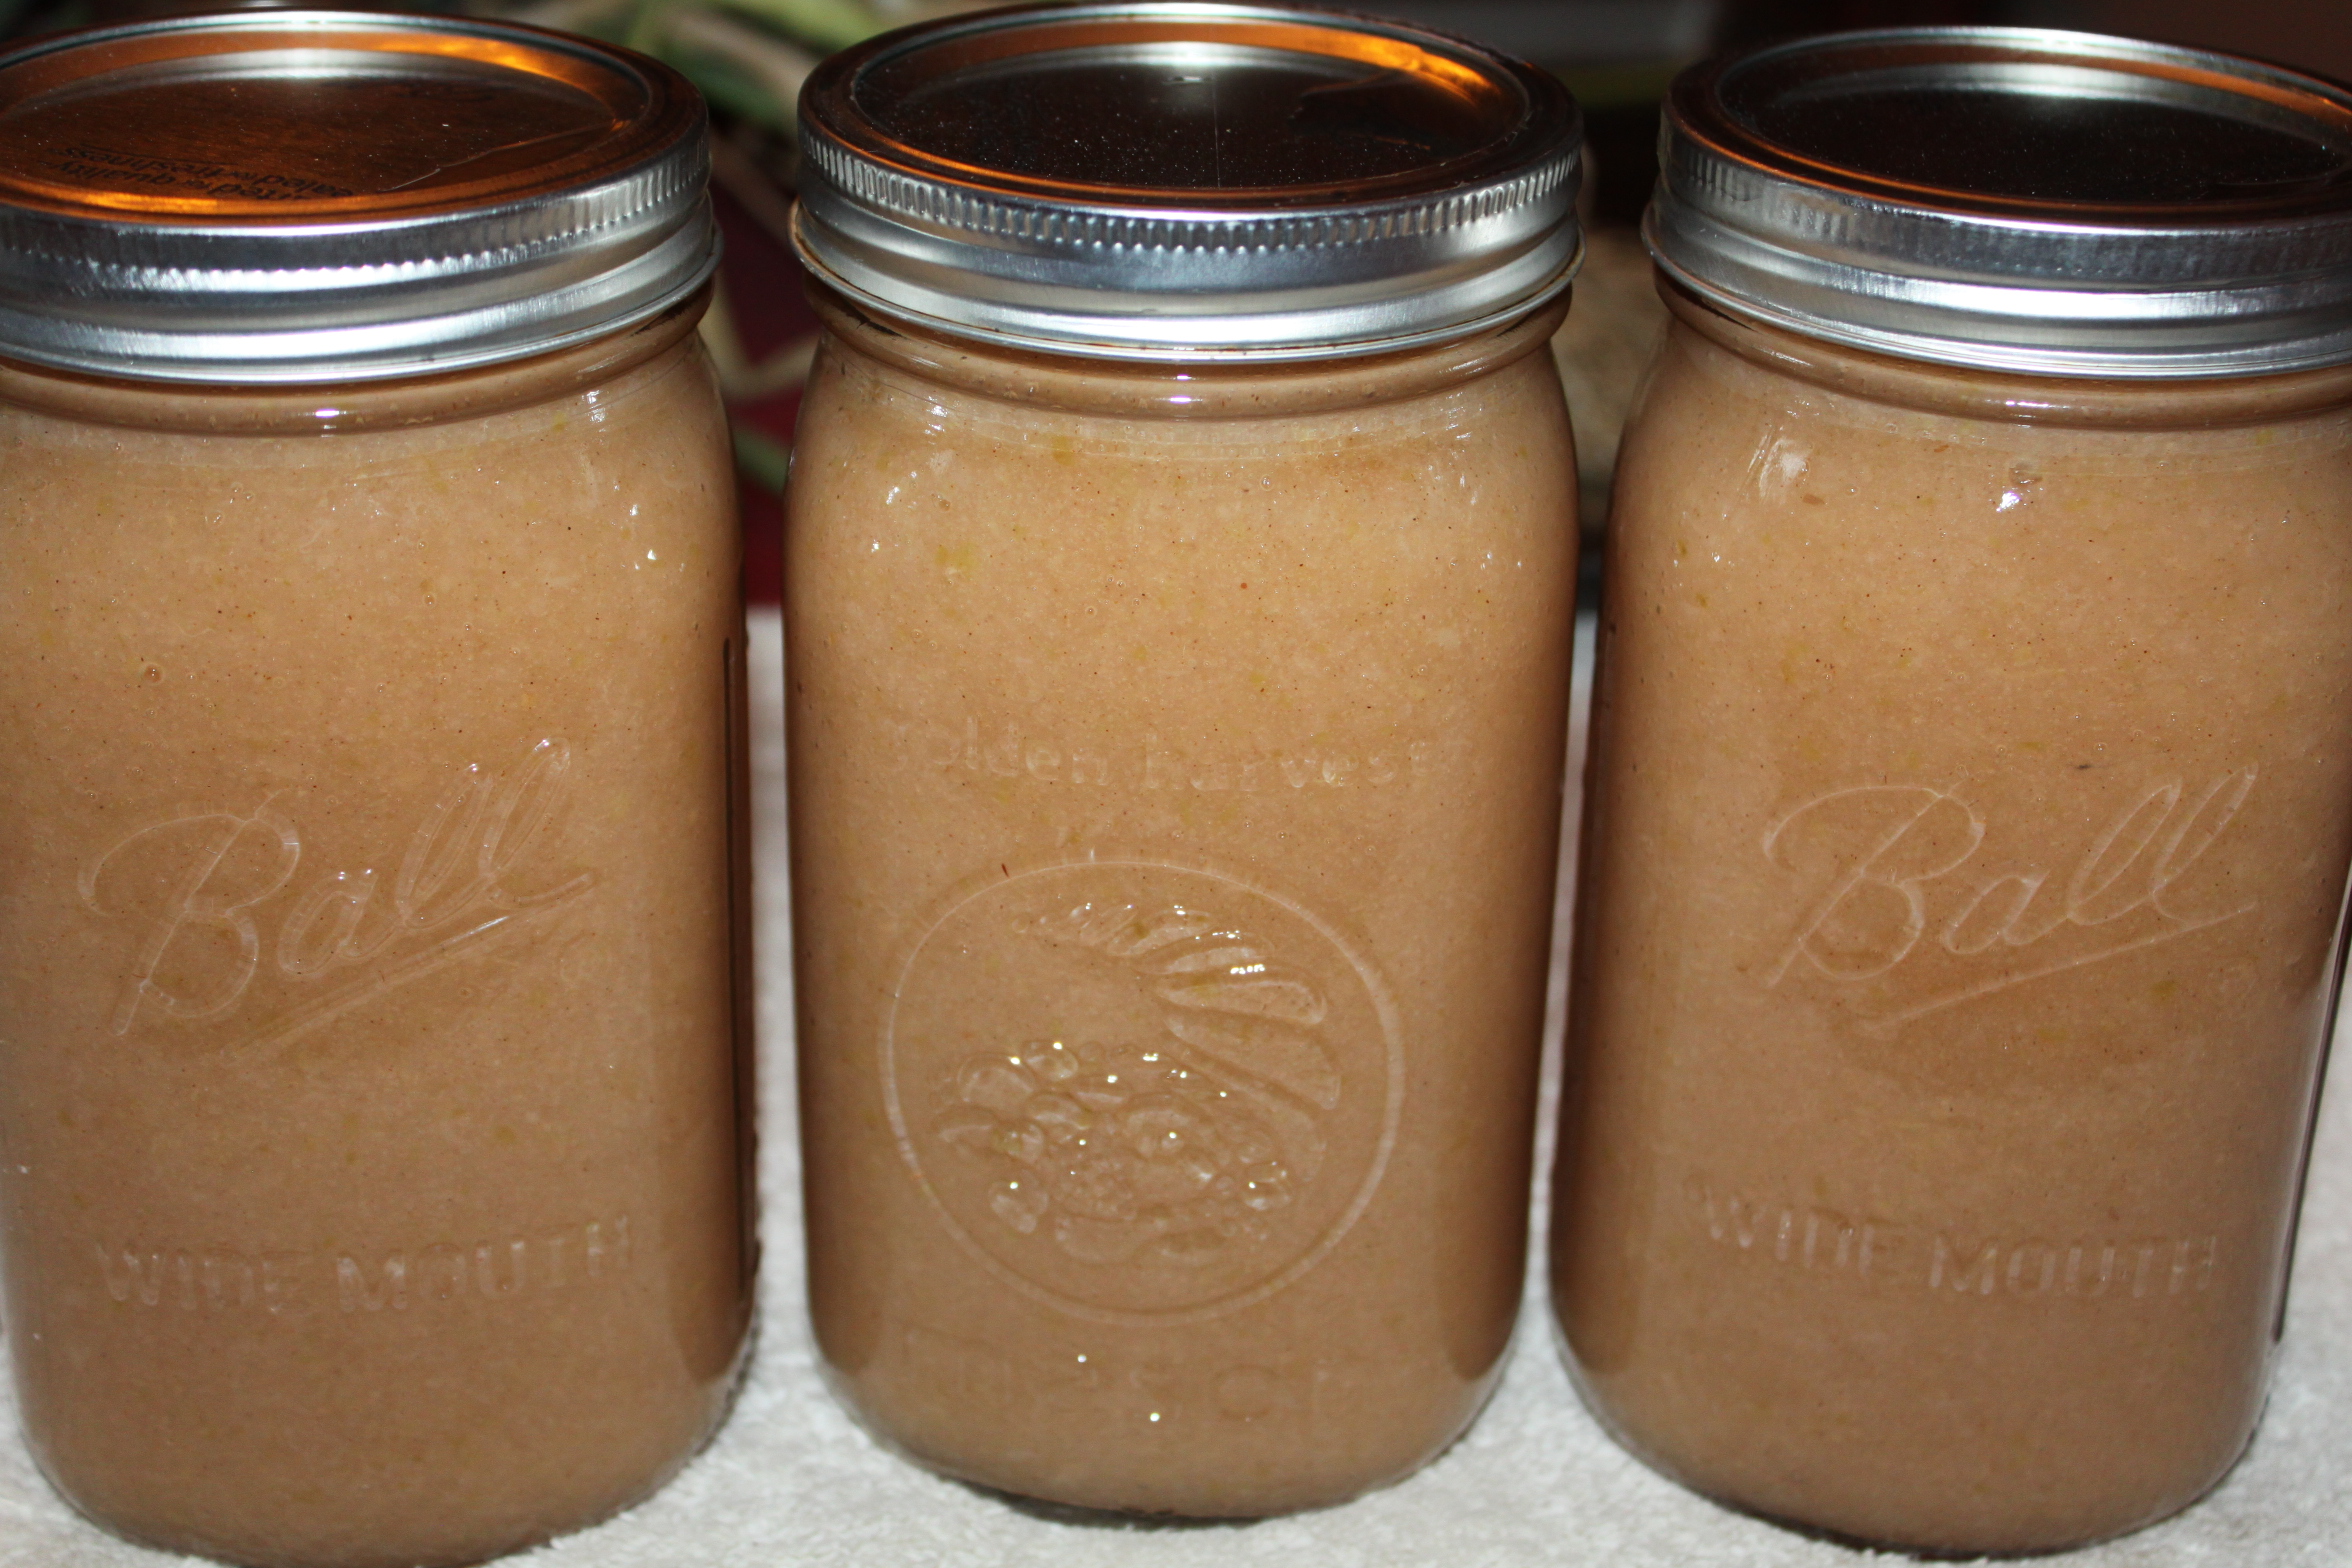
Homemade chicken stock cooling and ready for storage in the canning pantry
SNOW???? In October???  Yes, it is hard to believe that Jim and I were out in the garden this past weekend picking our last green and sweet bell peppers and 3 days later it is was snowing on the morning drive to work!  I guess it isn’t that surprising – we do live in Ohio. Like the old saying goes, if you don’t like the weather here, stick around a day or two, it will change.
The stock simmering in the pot
This week’s cold weather got me in the mood to make old-fashioned comfort food. Chicken and noodles over mashed potatoes, rustic chicken noodle soup, potato soup….you get the point.  As the temperature decreases, the need for stock increases. That doesn’t mean go to the grocery and open a box or can and pour it in.  I am talking about pure homemade broth made from the leftovers in your kitchen.  It is one of the easiest canning recipes that you can make!
Save those vegetable scraps in your freezer until you are ready to make the stock.
This week was a perfect time to pull out those lonely celery stalks, scraps of onions and carrots, and even the garlic scapes that have been taking up room in the kitchen freezer for the last month.  Use as many vegetables as you want to make a vegetable stalk, or if you have leftover chicken bones, throw those in for traditional chicken broth. Although you can freeze stock – today I wanted to use my pressure cooker one more time – a sort of send off to the canning season - and also save valuable room in our freezer!  Can’t wait to bring it back out in the spring!!!!

Homemade Chicken ( or Vegetable) Stock Recipe

Makes approximately 4 quarts
Ingredients:
Vegetable scraps – celery, onion, carrots, etc…
Chicken bones/parts (omit if making vegetable stock)
Salt
Pepper
Parsley
**amounts not specified because it depends on what you have on hand, and how your like your stock.  Ours never turns out the same but it is always delicious and flavorful!
Instructions:
Making stock is a great time to use up all of those leftover veggy scraps!
1. Place all ingredients into a large stock pot and cover with water
***Option – Place all ingredients in a crock pot and cover with water
2. Bring to a boil and simmer for at least 4 hours
***Option – Place crock pot on low and let heat through overnight (10-12 hours)
Straining the chicken stock
3. Strain liquid in another large pot and bring back to a boil.
4. Place liquid in heated and sterilized canning jars – add a heated lid and ring and place in pressure canner.
5. Follow your instructions for your pressure canner and process quart jars for 25 minutes at 10 lbs of pressure (altitudes less than 1,000 feet), and pint jars for 20 minutes.
***Option – if you don’t have a pressure canner don’t worry – you can still freeze your broth — Just place cooled broth in a freezer safe container.  Check out how we froze ours here.
Enjoy!

Wednesday, October 16, 2013

Can't wait to try our popcorn... next year, maybe strawberry popcorn?

Growing And Harvesting Popcorn – Popcorn Picking Time At The Farm!

The beauty of just picked strawberry popcorn.
This week was popcorn harvest time at the farm!  We have waited all year for our little crop to grow and be ready – and as the stalks began to turn brown – it was finally time for picking!
Popcorn is one of our favorite snacks at the house – and there is nothing  better than popping your own home-grown stash!  Popcorn is actually incredibly healthy for you.  No, we’re not talking about the kind coated in fake butter, salt – and popped in bags in a microwave.
Popcorn ears drying on the stalks - and ready to be picked.
Popcorn ears drying on the stalks – and ready to be picked.
What we love to eat is pure all-natural popcorn – which we pop in a stove-top wok (with a lid of course :) ), with just a simple tablespoon of extra virgin olive oil.  You could also just as easily pop in an air popper if you have one – but either way – you end up with a great snack that is high in fiber and low in calories. The taste of true home grown popcorn can’t be beat!
There are so many varieties of popcorn to choose from – but all in all – growing any of them is much like growing your own sweet corn – with the exception they stay on the stalk a little longer to mature into hard popping kernels.
Popcorn ears developing in mid-summer
We grow an heirloom variety called Strawberry popcorn – which produces anywhere from 2 to 4 miniature 3 to 5″ cobs with bright strawberry red kernels on each stalk.  The stalks of Strawberry corn are on the smaller size as well – growing anywhere from 3 to 5′ tall to maturity. That size works well for us – as we actually plant our popcorn seed by tucking it into one of our landscape beds that are filled with ornamental grasses and peppers.  It blends in well with the tall grasses and adds a litle extra dimension and beauty to the bed space.  It has become one of our favorite things to do in all of our flower beds around the farm – interspersing the beauty of annual and perennial flowers with peppers and other food crops that can also feed us.
In addition – the strawberry corn can be used for fall decorations, and then shelled afterwards for use – making it a great dual use plant!
Strawberry popcorn is a great dual use plant - it can be used for fall decorations and as a great popcorn later!
Strawberry popcorn is a great dual use plant – it can be used for fall decorations and as a great popcorn later!
You start by sowing seed in mid to late spring, allowing the stalks and subsequent ears that develop to become plump and mature.  We leave our ears on until early to mid September, or until the stalks and leaves begin to fade and turn brown. (For us, it should be early September, but with our wet and cooler summer this year – we just now picked our ears).
After picking – we let our ears dry out for a few weeks in the barn by hanging up or placing on an old screen to cure.  As soon as the kernels become dry and hard and fall of the cob with a little push of your fingers – they are ready to pop!
You can store the corn in mason jars or any sealed container – and they will keep long enough on the shelf until your next batch of popcorn is ready the following fall!Can't

Monday, October 14, 2013

Applesauce -- now is the time...

The Secrets to Canning Apple Sauce – Recipe of the Week

IMG_4660
Freshly canned applesauce ready to find room on the canning pantry shelf for use over the winter.
September means many things in our house.  Kids are back to school, the garden is transitioning into a new set of fall crops and being nourished with cover crops, and because we live in Ohio, football season.  But one of the best things about September is the abundance of fresh apples from the orchard.
Our orchard is still too young to produce apples, however, we are lucky enough to have a local orchard within 15 minutes of our home.  So as I was driving home from work this week, I decided to stop and pick up my first bushel of apples with the goal to make applesauce.  I remember the days when the kids were little, that applesauce was a staple in our house.  We packed it in their lunches, ate it for dinner, and even added it to several recipes instead of using oil.  At least we knew that we weren’t adding High Fructose Corn Syrup and white sugar to our diet.  If you use the right mixture of sweet apples, there is no need to add any sugar to make the perfect sauce.
Making your own applesauce is simple – especially if you follow the tips listed below:
1. You must choose the correct mixture of apples.  That’s right – mixture is the key!  Making applesauce with a variety of sweet apples will add the depth of flavor that you are looking for, without adding any sugar.   And don’t think of throwing those Granny Smith apples in the mix – although we all love to bake with these, they need to stay out of the applesauce mixture.
IMG_4633
Cortland, Jonathan, and Mollie ‘seconds’ from the local orchard. Perfect to use to make applesauce.
2. Do yourself a favor, and buy ‘seconds’ if you can.  Seconds are the apples that are either misshapen or damaged, which aren’t prime for raw eating. However, they make great apples for sauce or apple butter, at usually 1/2 or 1/3rd of the cost. Sometimes you have to ask for seconds – they may keep them in the back room, but are quite a bargain!
3. If you plan on doing any canning, invest in a food mill of some sort.  The time that it will save you is well worth the cost!  We have both a Foley Food Mill and a Roma Food Strainer and Sauce Maker.  Both have been essential in our kitchen!  If you are just making a small batch for dinner – skip the food mill and take the extra time to peel your apples before throwing them in the pot to cook down and then use a potato masher to make chunkier apple sauce.
4. The lemon juice/citric acid debate — I prefer not to add either of these to our applesauce.  It tastes and preserves well without them!  And most importantly, it isn’t necessary.
Remove air bubbles on the inside of the jar with a plastic utensil before sealing it with the lid.
5. When canning applesauce, be sure to get any air bubbles out of the jar by running a plastic utensil down the inside of your jars.  This will stop any air being trapped in the jars, expanding, and eventually continuing the oxidation process.
6. When your water bath is finished, remove your canner from the heat source and allow the applesauce to cool for 10-15 minutes in the hot, but not boiling water.  This will allow time for the applesauce to cool more slowly and condense without producing excessive air pockets at the top of your jars, thus decreasing the risk of excessive oxidation.
So with that said, here are the simple instructions on how to make and can your own applesauce…..

Apple Sauce Recipe

*makes approximatley 12 quart jars
Ingredients:
1 bushel of a variety of sweet apples – this time I used 40% Jonathan, 40% Cortland, and 20% Mollie
Cinnamon to taste – optional
Instructions:
Using an apple corer/slicer saves a ton of time when making applesauce!
1. Core and cut your apples.  Leave the skin intact but cut off any bad spots.  This is where an apple corer/slicer comes in handy — makes it very quick to fill your pot.
2. Fill the bottom of your pot with one inch of water, add a lid and bring to a boil.
Add one inch of water to the bottom of your pot, add a lid and let the apples cook down.
3. Once the water begins to boil, stir, reduce heat to medium and let the apples soften for approximately an hour.  (The lid should remain on during the heating process). Stir occasionally to prevent burning.
4. Once apples are soft, remove from heat.
Foley food mill being used to make the applesauce and remove the skins.
**Hint – if there is a lot of extra liquid, remove the liquid to prevent your applesauce from being too runny.  Save the juice to be used in later recipes.
5. While the apples are warm, run them through your food mill and return the applesauce to the stove on medium heat. (No need for a lid now)
6. Add cinnamon to taste and return to a light simmer.
The cinnamon has been added and the applesauce is ready for the canning jars.
7. Add to sterilized and heated quart jars.  Place a warm lid and ring on the jar and place into your canner.  Water bath jars by placing water at least one inch above the tops of the jars and wait until the water begins to boil.  Boil for 20 minutes.
8. Once your time is up, remove canner from the heat source and let the jars sit in the warm water for 10-15 minutes.
9. Remove jars and let cool on a towel in a cool place, away from drafts.  You should begin to hear that wonderful ‘POP’ sound of the jars sealing.  Let cool for 24 hours – then check by pushing down on the lids to make sure the jars have sealed.  If you can not press in the lid, store in a cool dark place for up to a year.  If the jar did not seal properly, immediately place in the refrigerator and eat within 4 weeks.
Enjoy!
Mary and Jim

Wednesday, October 2, 2013

Plant your own garlic!

How To Grow, Cure And Store Your Own Garlic

Fresh Garlic just harvested from our garden
Garlic is a staple in our household.  Whether added to a pasta dish, salsa or stir fry – it seems like a clove or two finds its way into our meals almost daily.  In addition, the consumption of garlic has many well known health benefits – including its antioxidant properties.  It is also an easy crop to grow and store, making it a great addition to grow in your garden.
There are two basic types of garlic – hardneck and softneck.  Softneck garlic grows well in warmer and milder climates, and usually are grown in the same calendar season.  They do not produce scapes, but do tend to store a little better than the hardneck.  Softneck varieties are used to make the garlic braids you see in stores.
Hardneck varieties grow best in the cooler climates of the Northern US – and are the most commonly planted form of garlic.  It is also what we plant and will cover in today’s post.  Hardneck garlic should be planted in the fall for an early to mid-summer harvest the following year.  Hardneck varieties are also what produce garlic scapes - the delicate shoots coveted by many chefs and cooks each spring to add great flavor to salads and dishes of all types.
THE BASICS OF HARDNECK GARLIC:
When To Plant:
A single clove of garlic ready to be planted. Separate your bulbs into single cloves and plant with the pointed side up a few inches down in the soil
Although you can plant garlic in the spring, the best time to plant it is in the fall, allowing for a nice mature crop to be harvested the following early summer.  We have grown it both in the spring and fall, and quite frankly, the spring garlic just does not have enough time to develop much bulb growth.  Fall planted garlic can produce larger yields – and the taste is far superior than spring planted bulbs.  For us   best time to plant here is in mid September to early October.
The Soil:
Garlic shooting up in early fall through the straw mulch
Much like most vegetables, garlic will grow best in rich, fertile and loose soil – so it is best to work in a generous amount of compost to your soil prior to planting.  If your soil tends to be on the hard-pan clay side, don’t be afraid to add a few shovel-fulls of sand in when you work your beds. Along with the compost, it will help to loosen up the soil structure and make it easier for the garlic to grow.
Planting Garlic:
Each single clove of a garlic bulb is an individual “seed” that will grow a full bulb.  In general – the larger the clove – the larger the full garlic bulb will be that is grown.  We like to select the largest of the bulbs each year to use as our seed cloves for the coming year.  To prepare the cloves for planting –  take your bulbs and separate each clove carefully – trying to keep as much of the papery skin in tact.  The skin serves as a protectant for the garlic as it sits in the soil waiting to sprout.
Make sure to plant with the pointy end of the garlic up.
Some people like to soak their cloves a day or two before planting in a quart jar filled with water and a teaspoon of baking soda.  It is said to help the garlic sprout and help prevent ground rot.  We have never used the procedure and our garlic has always performed well without it. 
Garlic can be mass planted in raised beds or raised rows like ours – so we actually plant 3 rows in a single 18 to 24″ wide strip – leaving about 4 to 5″ inches between each planted row.  It can also be grown in a single row if you wish.
Once you have decided where to plant – dig a trench about 4 inches deep.  We then like to fill in the trench without about an inch of compost, and then plant each bulb down into the compost layer.  When planting – make sure to keep the pointy end of each garlic clove up – and the flat end down.  Then simply cover up with the remaining soil, and add a few inches of straw or shredded leaves as a mulch for the cold winter months.
You should see shoots coming through the ground within 2 to 4 weeks and the garlic will continue to form and grow before going dormant in the cold winter months.  No worries –  it will come back to life in the spring and continue growing.  Keep your garlic weeded and mulched through the spring – the less it has to compete for nutrients – the larger your resulting cloves and harvest will be!
Garlic Scapes:
Garlic scapes snapped off from our plants a few weeks back in June
In late spring / early summer – you will notice curly spikes starting to emerge from your hardneck garlic – these are known as garlic scapes.  You will want to cut these off as they appear – which will force the garlic to grow larger bulbs underneath the soil and not spend it’s energy on the curvy and exotic looking scapes. Don’t just toss away those scapes however – they make a delicious addition to salads and dishes in the kitchen!  See : What To Make With Garlic Scapes
The Harvest:
Here in our Central Ohio climate – garlic is usually ready to harvest around the first week of July.  The tops of the garlic will begin to brown off, and as soon as  to 3/4 of the top stalk begins to die off, it’s harvest time!
Digging up the garlic
Using a pitchfork or a shovel – carefully dig your garlic by digging down about 6 inches beside the stocks – and lifting them slowly from the earth.  We then use our hands to gently knock off all of the soil from around the garlic bulb and roots – taking care not to damage any of the cloves or stems.  The more careful you are in this stage – the better chance your garlic has to cure and then store later without losing any to rot.
Once you have cleaned them off – it’s best to get them out of the direct sun, and begin the process of curing the garlic.  Curing is different from long-term storage.  To cure, we like to hang the garlic in a well ventilated space out of the direct sun.
Garlic curing on our back porch
For us – our back porch is a prime curing location.  We hang the garlic up for a few weeks and allow it to air-dry.  Once the bulbs are dry – you can then cut off the stalk about 1″ above the bulbs and the roots to about a half inch below the bulb.  Store your garlic in a cool-dark place for use throughout the year.   Garlic will keep longer if you allow for air circulation.  We keep ours in a mesh bag in a dark corner area of the basement – and it usually will keep through the winter.
So get ready to plant some garlic this fall and Happy Gardening!

Tuesday, October 1, 2013

If you haven't done this, you should try next year!

The Basics Of Saving Seeds From Your Garden And Landscape

Our ornamental peppers in the landscape - we grow all of them from saved seed each year.
Our ornamental peppers in the landscape – we grow all of them from saved seed each year.
One of the most rewarding experiences for a home gardener is growing their own plants from seeds saved from the previous year. Not only is it an economical way to grow – but there’s something magical about seeing a plant take shape from your own seed.
We save heirloom tomato and pepper plants for growing in the garden – but by far our biggest “seed-saving” operation comes from the ornamental peppers we grow.
There is something so exciting about starting plants from your own saved seeds
When you plant as many as we do around the farm – in mass plantings, flower pots and hanging baskets – you have no choice but to grow your own from seed!  Last year we grew the Sangria, Poinsettia and Tequila Orange and Chinese Lantern varieties – and will probably add a few more this year as well.
Whatever your choice – saving seed is not a hard process at all.  However, there are a few basic things you need to know to ensure success.
The Basics Of What To Save:
From just a handful of peppers - we saved close to 400 seeds.
From just a handful of peppers – we saved close to 400 seeds.
First, concentrate on heirloom or standard varieties – they are the easiest for the home gardener to preserve and grow.  These plants are open-pollinated and will produce the same crop year after year. Many standard varieties of peppers, beans, and tomatoes can be saved and grown year after year.
Hybrid plant seeds on the other hand should be avoided. Hybrids are created by crossing specific parent plants. Many times, the seed of hybrids will be sterile or will not reproduce a flower or fruit that resembles anything close to what the original plant created.  Many hybrids produce beautiful flowers or fruits, but it is best to purchase that seed each year to produce the identical results.
Unlike hybrid varieties - seeds from heirloom tomatoes like this Brandywine can be easily saved from year to year
Unlike hybrid varieties – seeds from heirloom tomatoes like this Brandywine can be easily saved from year to year
One other note – even if your plants are heirloom and/or self pollinating varieties – don’t be surprised if your plants change a little from year to year. Some plants’ flowers are open pollinated by insects, wind, birds and other wildlife – and they can be crossed with other varieties of the same plant that are nearby. The only true way to maintain the exact original variety would be to isolate the plants or plant them hundreds of yards apart from each other – something that is hard for many small home gardens to accomplish.
When and What To Harvest:
We let the pods on our Sangria plants dry right on the plants before picking and saving the seed
When saving your seed, always harvest from the best your garden has to offer. Select plants that are healthy and with the qualities that you find to be most attractive.
You will want to harvest seed from flowers or fruit that has matured – and that is why fall is the perfect time to collect your seeds.  Many peppers and beans have fully matured and their seed pods are fully developed. We let our ornamental pepper seeds dry right on the pods of the plants before picking them in late fall to save the largest of the seeds.
Storage of Seeds:
We start almost all of our seeds on our home built seed starting rack
We start almost all of our seeds each spring on our home built seed starting rack
The most important part of storing seeds is to keep them dry and cool. After drying our seeds, we store them folded up in a paper towel and place in a canning jar or envelope in one of the cooler rooms of the house.  If you happen to have any of the cilica gel packets that sometimes are packed in electronics or shoes – you can place one in with your seeds to help keep out the moisture.
Refrigerators can be a good place to store seeds as well, with the cool temperatures helping to preserve them. Although if your like us, space is hard to find!  All things considered, we have never had a problem keeping them in an old desk drawer in one of the cooler room of the house.
One final note – make sure to label your saved seeds with their name and date.  Speaking from personal experience –  it can make for quite the surprise when you grow an entire tray of tequila orange peppers from what I thought should have been jalapenos.  Let’s just say I learned to mark the envelopes a little better after that!