As many of you know, we have started making our recipes into quick videos on our YouTube channel. We just want you to know how much we appreciate YOU (our readers . . . and our video watchers!) and your support in this new venture. It's been fun to let you into our kitchens and see what we are like in real life.
Today's recipe is one of my husband's favorites. I have mentioned before how he is such a "meat and potatoes" guy and the only way he will eat soup is if it's thick and hearty. Well, this soup fits the bill- it's loaded! But I love it because it's loaded with good things and you can add even more vegetables if you'd like.
Here is the video of me putting it together (or you can scroll down to get the printable recipe):
Stuffed Pepper Soup Ingredients: 2 lbs lean ground beef 8 cups beef broth (I used reduced sodium) 2 (14 oz) cans diced tomatoes, undrained 2 cups cooked rice 2 green bell peppers, chopped 1 onion, diced 2 cloves garlic, minced 1/4 cup brown sugar 2 teaspoons salt 1 teaspoon pepper 1 tablespoon Worcestershire sauce
Directions: In a large skillet, brown hamburger with onion and garlic until beef is no longer pink. Rinse grease from hamburger and dump into a large stock pot. Place stock pot on stovetop and add remaining ingredients. Turn heat up to medium high and bring soup to a boil. Reduce heat to low, cover with lid, and simmer for 35-45 minutes. Serve with Cheesy Garlic Flat Bread anddinner is done!
How to Make and Preserve Your Own Pumpkin Puree – Recipe of the Week
Pie pumpkins make the perfect pumpkin puree to use immediately or store for later use
When you think of October, what do you think of? Besides the obvious Halloween holiday tradition, pumpkin ‘everything’ comes to my mind. Families are taking trips to their local pumpkin patches to take “How Tall This Fall” pictures, and of course, to gather the decorations for their front porches.
Because of the abundance of pumpkins this time of year, it is now that we start storing up pumpkin puree in my freezer. Homemade pumpkin puree is simple to prepare and the taste makes canned pumpkin that you find in the grocery store taste bland. Aside from the obvious use in pumpkin pie, it comes in handy for pumpkin bread, pumpkin muffins, pumpkin dip, pumpkin cookies, and pumpkin butter. And the health benefits of pure pumpkin puree are too plentiful to mention.
The most common question that we get about pumpkin puree is how to properly preserve it. I am sad to say, canning the puree is out of the question. Based on USDA guidelines, the only option of canning pumpkin is by cubing chunks of pumpkin and pressure canning for a really long time. Water bathing is not an option. So, in our quest to preserve the autumn’s gift of pumpkins, we resort to freezing the puree in 1 cup portions in freezer bags. By freezing them in flat bags, the amount of freezer space that it takes up is minimal. And that is a good thing, because this time of year, our freezer is almost full!
Homemade Pumpkin Puree
Make sure to wash the outside of the pumpkin before cutting
1. What pumpkins to use? — I prefer to use pie pumpkins….they are naturally sweeter and their flavor is more consistent than the pumpkins that you use for jack-o-lanterns. However, many people use the larger pumpkins with good results.
Scoop out the strings and seeds –save the seeds for roasting later.
2. Wash the outside of your pumpkin. Of course, the pumpkin rind is not included in the final puree product, but when you cut your pumpkin, whatever is on the outside will soon be on the inside.
3. Cut off the top stem and discard. Make sure you have a large sharp knife and a steady surface to work on.
Put your seeds into a colander and you can wash them off and dry them for later use.
4. Cut the pumpkin into 4 quarters. If you are using larger pumpkins, you may want to cut the quarters in half.
5. Remove (but please do not discard) the seeds — you can roast these later.
6. Remove all the stringy pulp that is around the seeds – using an ice cream scoop with sharp edges makes this process go much smoother.
Roast pumpkin quarters either face down or face up – we prefer face down for easy peeling of the rind
7. Now there are several ways to cook your pumpkin for easy removal of the flesh. Directions for steaming are located here. You can also microwave the pumpkin pieces in water, or roast them. This time we chose the roasting method, as we had other things to get done while it cooked down. Place each of your pieces on a baking sheet and bake at 350 degrees F for 45-60 minutes.
Peeling back the rind of the pumpkin after roasting.
*Experiment: We placed the pieces both face up and face down to see if there would be any difference. We did not notice a difference in the cooking process, however, we found that it was easier to ‘skin’ the pumpkins rather than scoop out the puree. Therefore, roasting them face side down was the better option for us – but it really doesn’t matter.
Place the pumpkin into the food processor, blender or use an immersion blender to puree
8. Place the puree into your food processor, blender, or in a bowl to use with an immersion blender. Blend until smooth. You could also use a food mill if that is your only option.
1 cup of pumpkin puree ready to be frozen.
9. Measure puree into one cup portions and place into a freezer safe container. We prefer to use freezer bags as they are able to lay flat and store easily in our overused freezer.
Now you have fresh pumpkin puree to use whenever your recipe calls for it!
Enjoy!
**If you would like to receive our Recipe Of The Week each Friday – be sure to sign up to follow the blog via email in the right had column, “like” us on the Facebook, or follow us on Twitter.
How To Start A Great Compost Pile This Fall – For Free!
Compost is the key to a healthy garden!
There is no better time to get loads of compost materials than in the fall! Even better – with a little legwork, you can secure all of them for free!
Compost is a necessity if you want to keep the soil in your garden productive year after year (See: Composting 101). Along with cover crops, using compost in the garden helps to rebuild and re-energize your soil with the vital nutrients that plants need to grow strong each year.
So whether you’re a seasoned veteran of composting, or have always wanted to start your own compost pile, here are some of the easiest ways to finding free materials to start your pile this fall:
Leaves:
Maple leaves are some of the best to add to your garden.
The mother-load of free material available for free every fall! Just take a short trip around a few wooded neighborhoods, and you can have an endless supply of leaves for your pile. Many times, they are already bagged at the curbside for easy pick-up. We collect as many as we can each fall and store the extra for use throughout the season. It’s a great way for us to have a year-round supply for use in future compost piles or mulching garden plants.
Although leaves are plentiful this time of year – some are better than others. Maple, Birch, Ash, Beech and fruit tree leaves are fantastic to compost. Oak leaves on the other hand should be composted in moderation. Oak leaves tend to be more acidic – too many in the compost pile can result in compost that is less than ideal for most vegetable gardens. A good rule of thumb - if oak leaves make up less than 10 to 20% of your total pile – you should be good to go. Another valuable tip – shred them with your lawn mower before adding them to your pile – it helps speed up the decomposition and composting process!
Fall Decoration Bounty:
Fall decorations are plentiful after the season.
As you drive around your neighborhood in the fall – ever notice all of those straw bales, pumpkins, gourds and corn stalks everyone is using for decorations?
Unfortunately, most of them end up in the garbage can when the season comes to a close. They can be yours simply for the asking – and are great additions for your compost pile.
Most people are more than glad to give them to you when finished - and it’s a win-win for everyone. Each year, we end up with quite a few bales of free straw and a slew of pumpkins and gourds from friends and family.
Garden and Yard Waste:
Apple peels and other kitchen scraps go great in compost piles
Cleaning out that garden is a great way to start your pile. Corn, bolted lettuce plants, green bean and other plant stocks are a great addition to your pile. The key again is to chop them up with a shredder or lawn mower to speed up the decomposition process.
You can also add the spoils of your late summertime and fall kitchen canning and cooking projects – such as scraps like apple peels and pumpkin rinds. A few words of caution – we do not add our tomato or pepper plants to the pile – it just seems to carry to much risk of passing on disease and loads of volunteer plants coming up from our compost from the previous year.
Think Outside The Box:
Beyond the traditional garden and landscape sources – think outside the box to get some great free additions to your pile. If you have a local breakfast joint or coffee house - they can be a great way to gain regular nutrient rich additions to your pile.
Many small breakfast and coffee houses will save their coffee grounds and egg shells for you
Coffee grounds, egg shells, potato and other vegetable peelings are a perfect choice for adding to your pile – and small breakfast and coffee shops are a great place to find them! In fact, many coffee houses routinely save their grounds for customers. Some bigger chains even create a list of customers to save grounds for – insuring that the by-product of all of their brewing won’t end up in the local landfill. Either way, you can get a great cup of coffee, breakfast, and free compost materials! We have just such a place down the road from us – and they gladly save their coffee grounds and shells for us to pick up each week.
So what are you waiting for? Get that compost pile started! And if you don’t have a place to compost yet – you can check our article on how to build your own neat little compost bin on the cheap with pallets! (See:How To Build Your Own Compost Bin With Pallets)
If you would like to receive our DIY & Gardening Tips every Tuesday – be sure to sign up to follow the blog via email in the right hand column, “like” us on Facebook, or follow us on Twitter.
Growing Simple…How To Keep The “FUN” In Gardening…And Maybe Life!
Our Weekly Farm Update Stories
We could do the usual for the Sunday Update and tell you what’s happening at the farm. You know, like our garlic is about to be planted along with our fall onions – and that we have started to plant cover crops in the old tomato rows – or that the pepper crop continues to produce like we never thought possible!
But instead – I thought I would take a moment to answer a question we seem to be asked almost every day by someone – How do you keep gardening and your projects so fun?
It may sound crazy – but I miss all of the fun we had building the barn together – the key is to find fun in the process – not just the finished results.
I realize that there are a lot of variables in gardening that can drive a person crazy. First the weather: frost and freeze worries – too much rain or perhaps a drought – windstorms, hailstorms, dust storms…you name it, and it can happen!
If that wasn’t enough – then come the pests – cabbage worms, aphids, beetles and grasshoppers – to be followed by the bigger ones like raccoons, rabbits and deer! Should you build a fence – do you need to spray – do I need to water…and why did my cucumbers just fall over and die?
We haven’t even gotten to weeds yet! Before you know it – it’s not fun anymore.
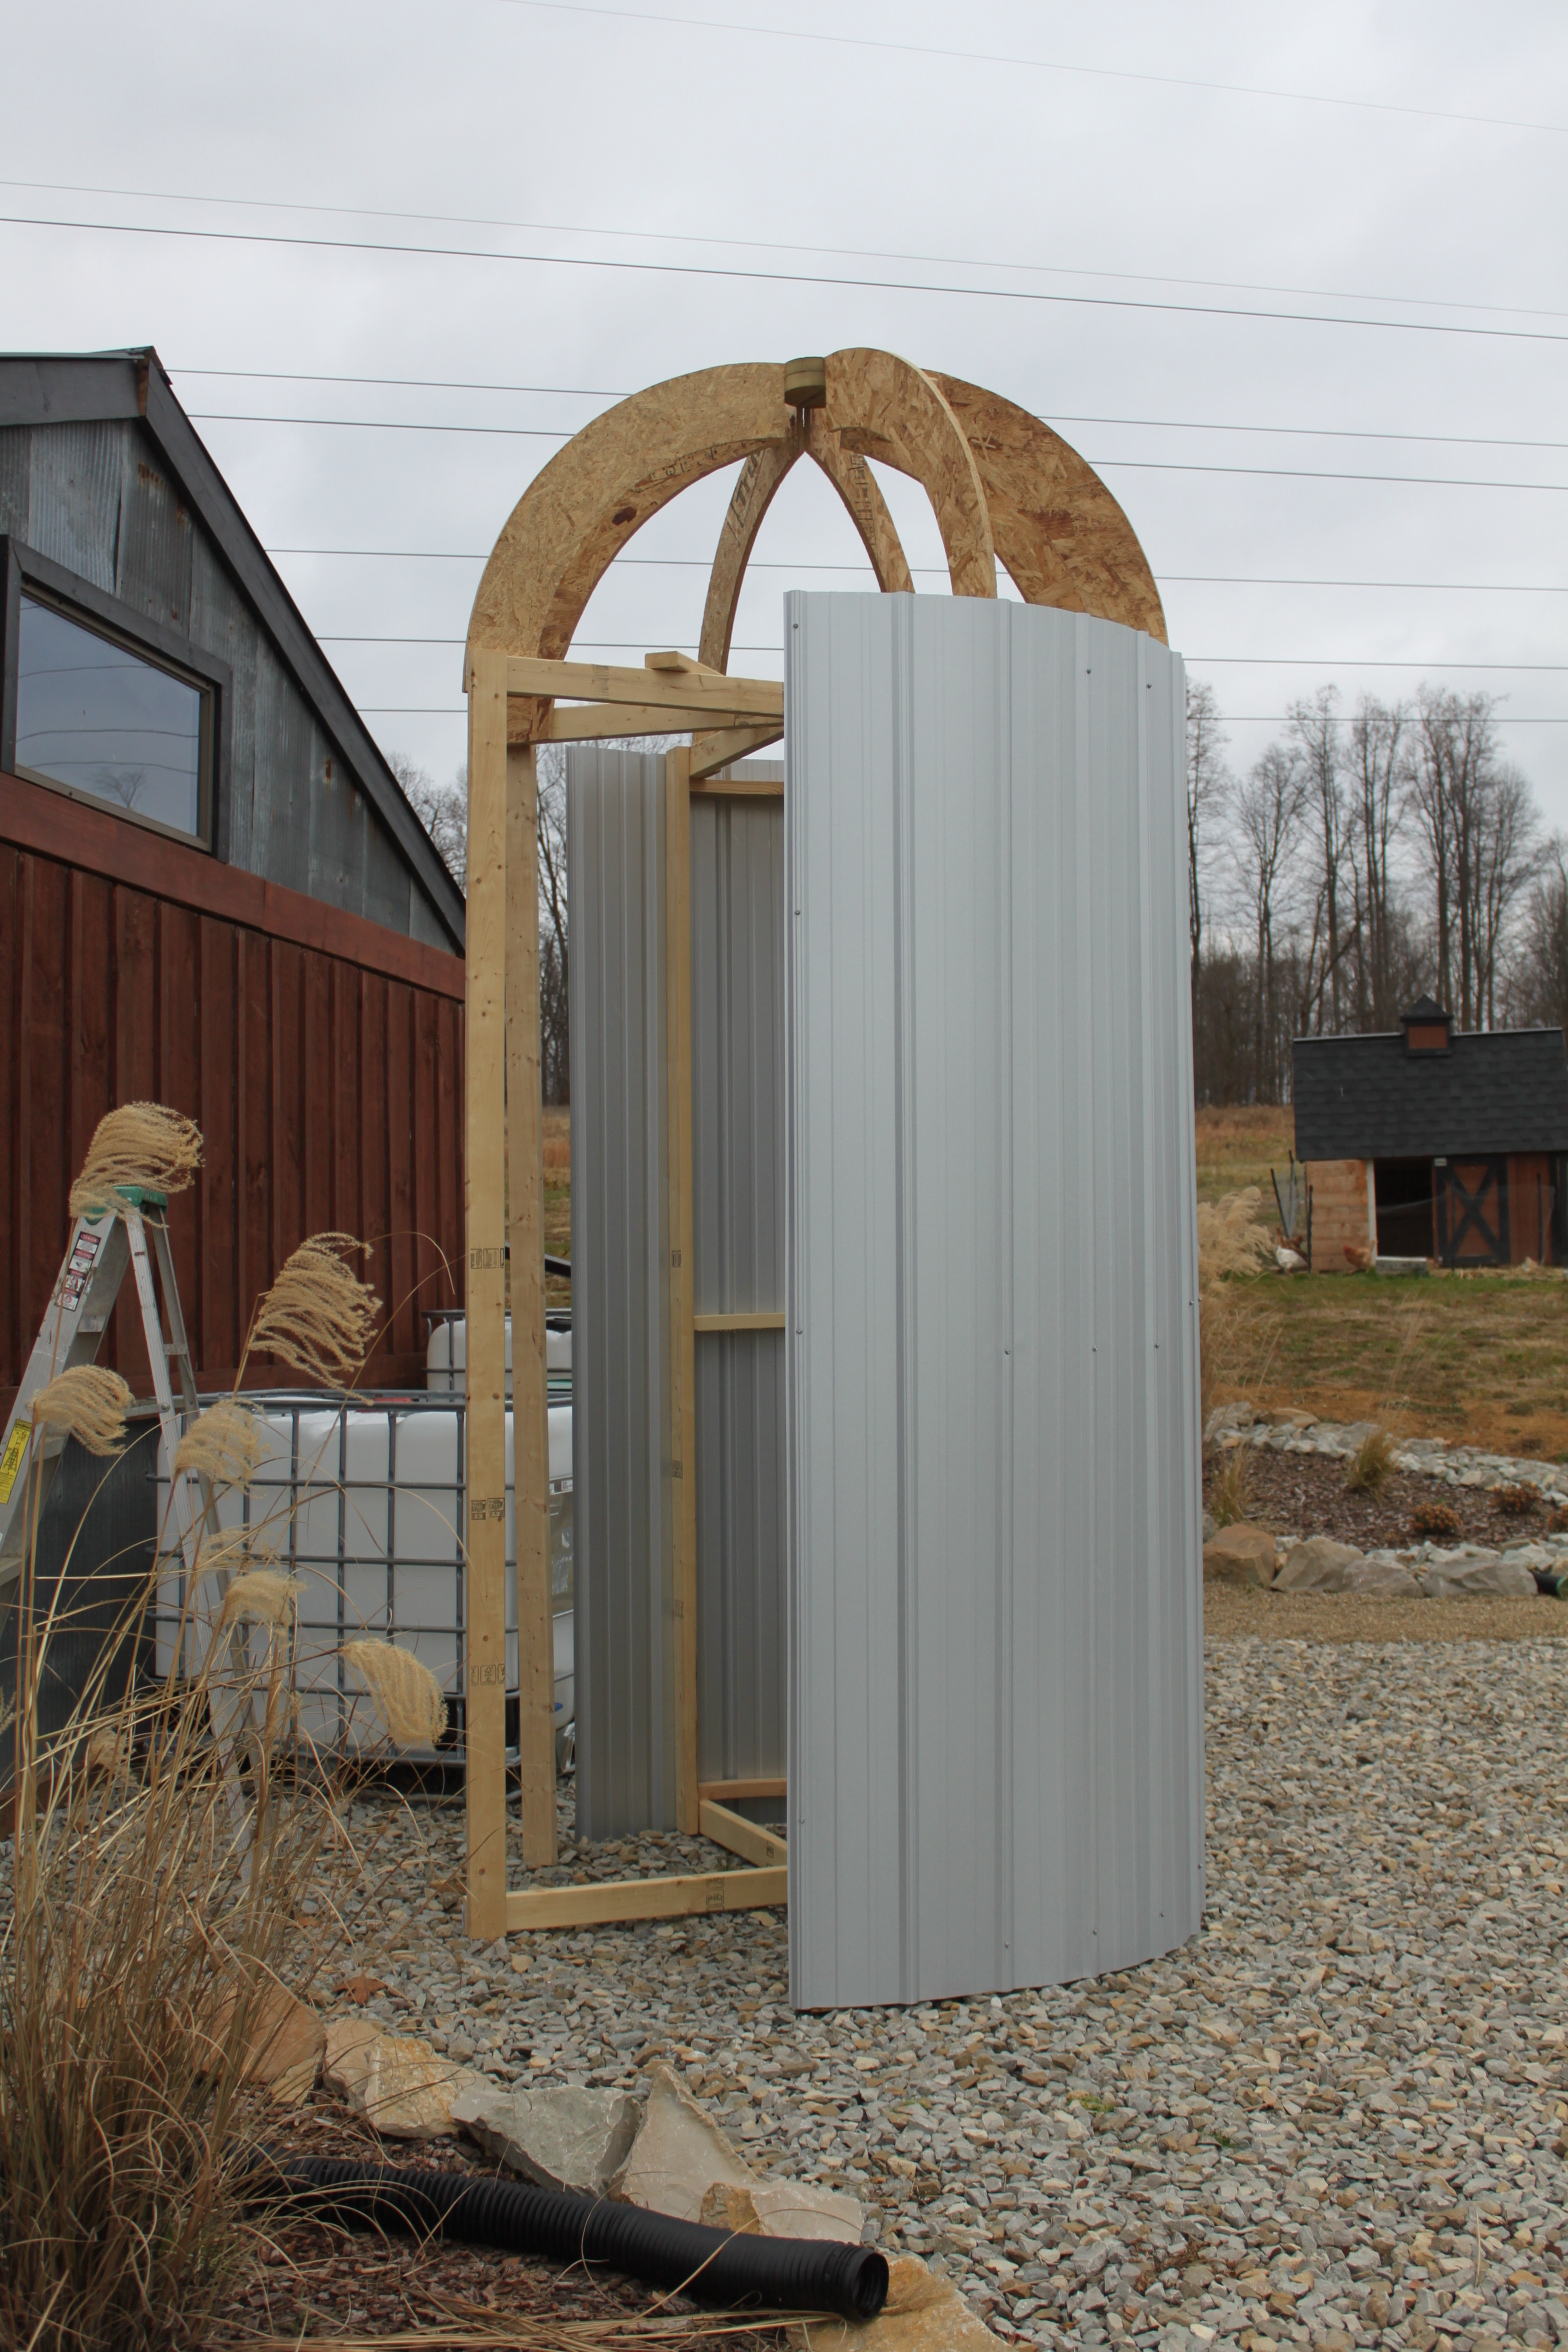
The ill-fated silo project! It may have failed -but we still have fun talking about trying to build it.
The same goes for our building projects. I can’t tell you how many times something hasn’t lined up – or fit the way it was supposed to – but that doesn’t mean it can’t be fun to build or make them.
The real key is this – make the “fun” about the process and not the results.
Think about it for a moment…If you could just simply throw a few seeds in the ground and thousands of perfect tomatoes grew from it without any work – would it really be fun? If you could just pound a few nails into a board and have a coop or a barn – would it mean anything?
As a great example…for some reason – no matter what we do – we have had a hard time the last two years getting large yields from our cucumbers. It’s something that we keep working on, and will figure out at some point. In fact –Mary and I have already schemed out next year’s plans to have the harvest of a lifetime. Whether we do or not – we have more fun in the banter back and forth about trying to figure it out together than if the plants had grown well in the first place!
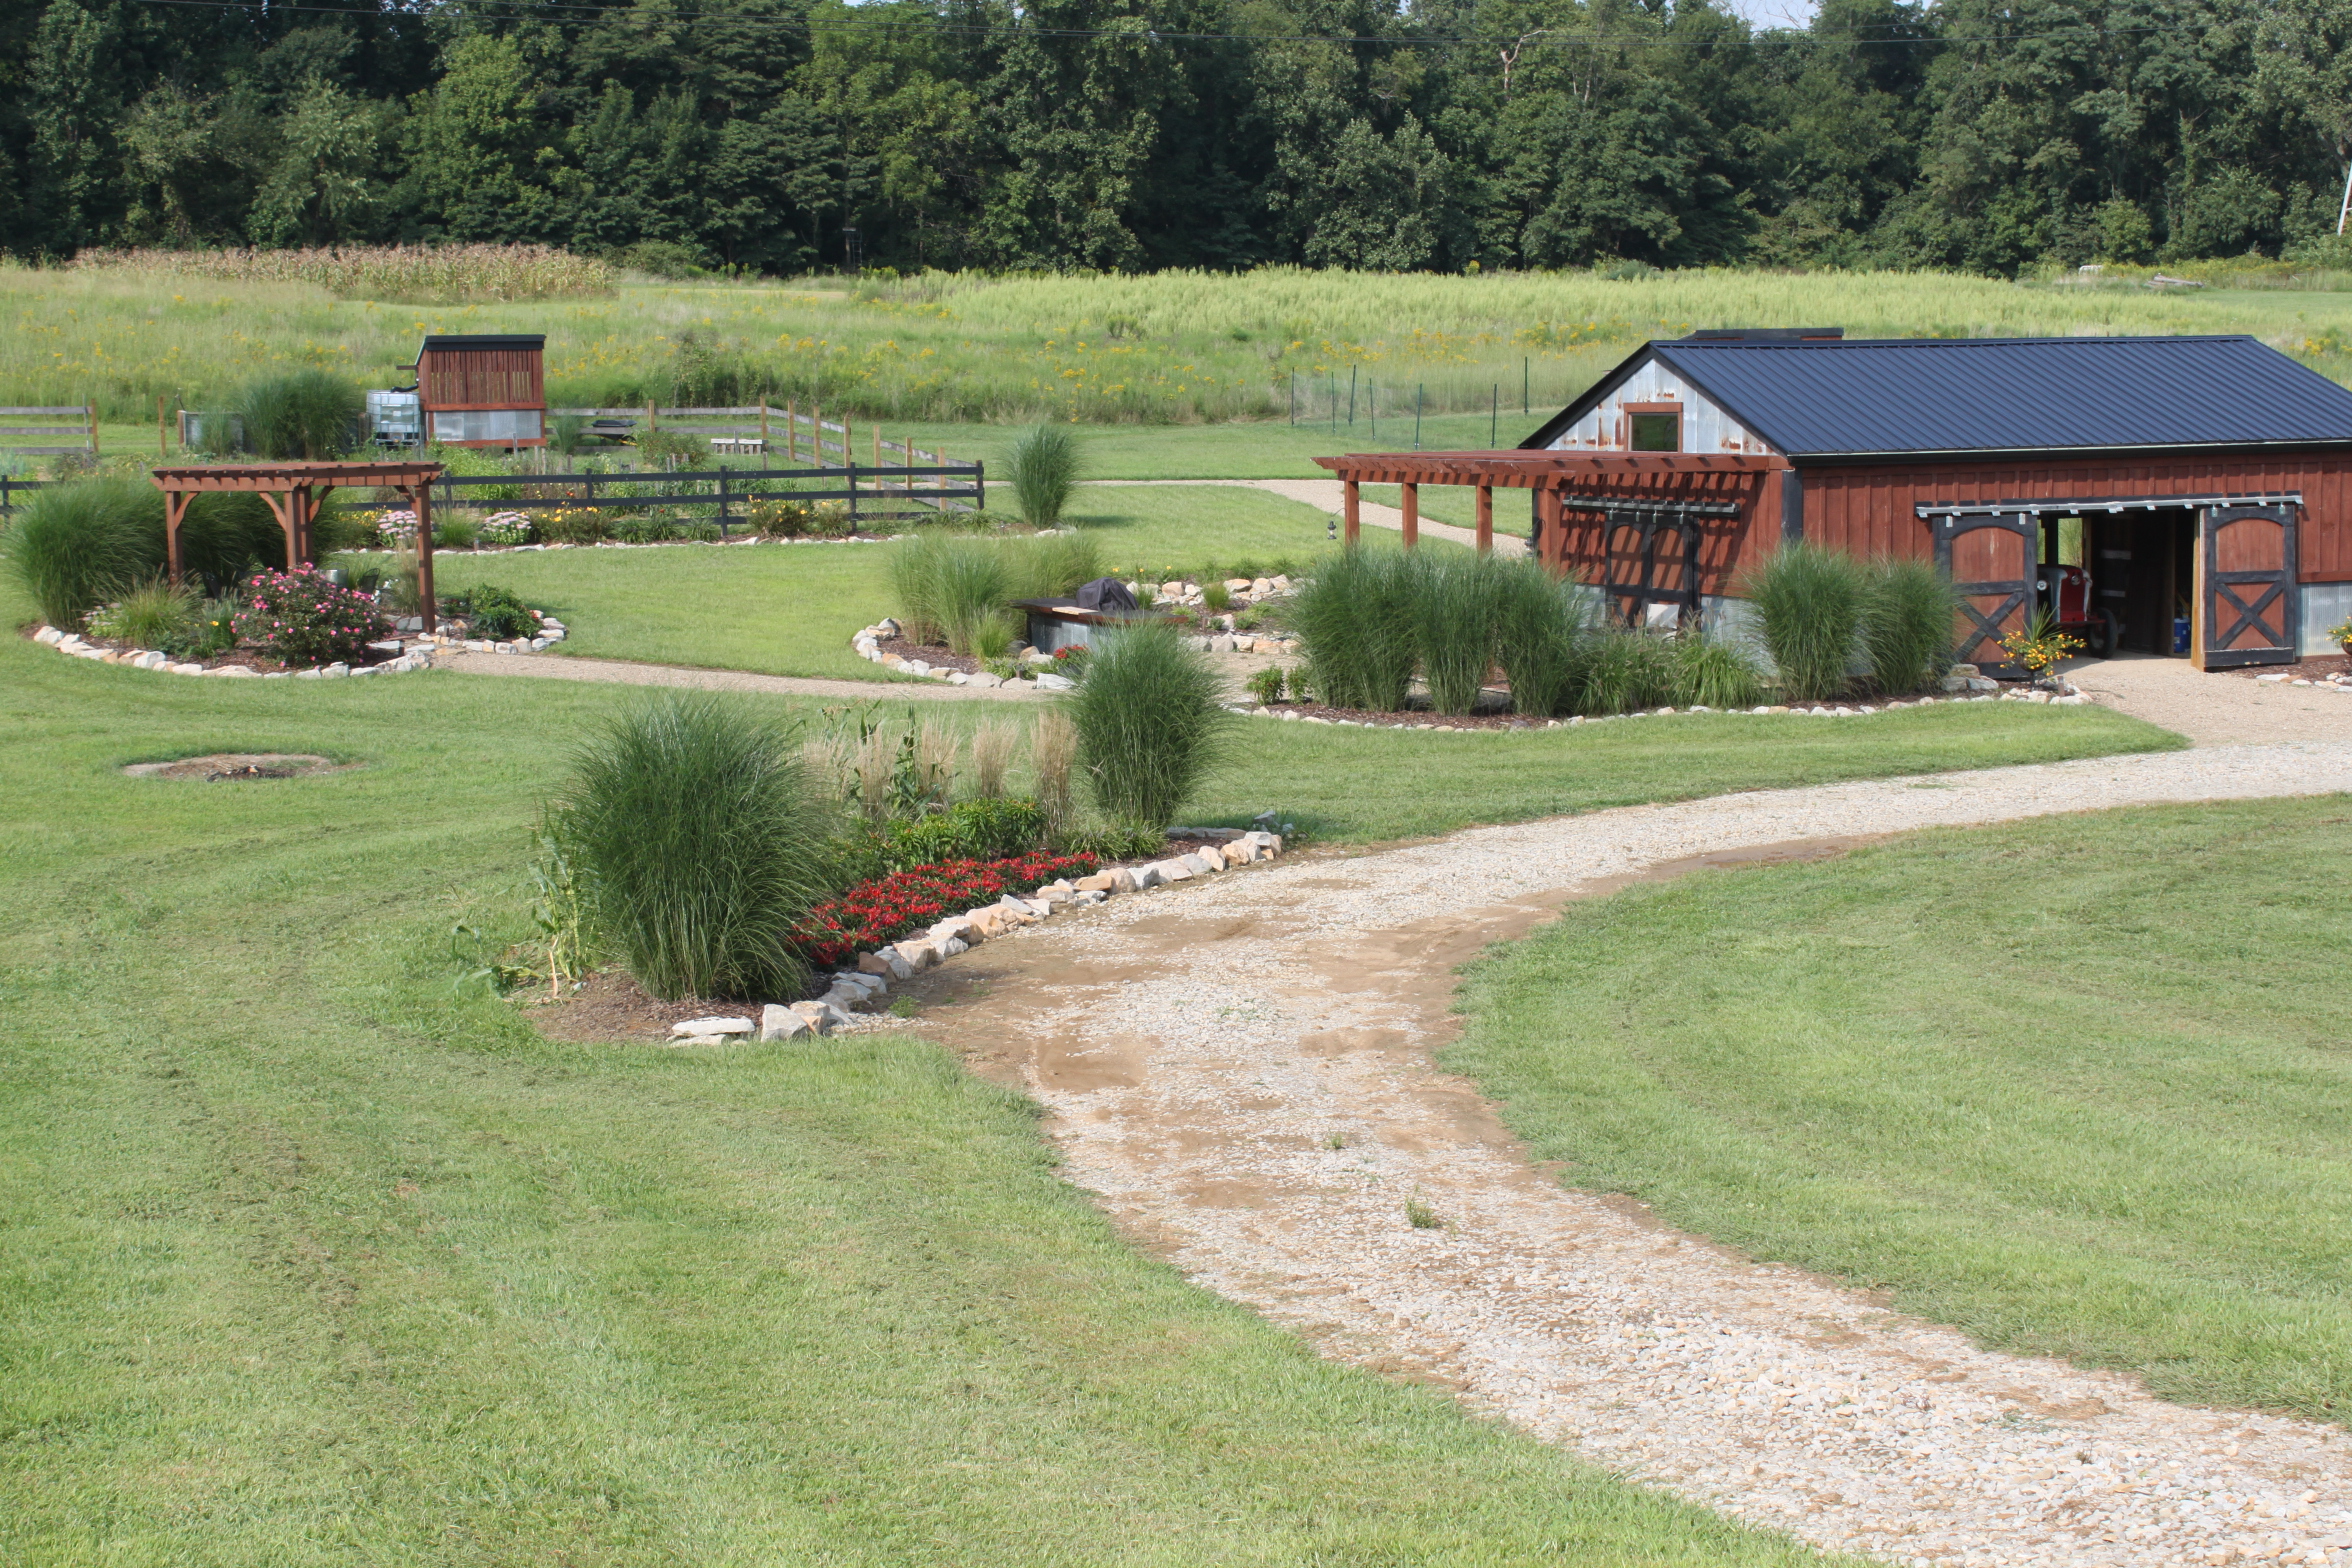
The farm from the top of the hill..it will always be a work in progress..and we are more than OK with that!
I was looking back over the last year and a half of our Sunday Farm Updates (see: Past Sunday Farm Updates)…and it hit me that we always talk about our farm and garden as a “work in progress”. We utter those same words to those that visit or tour the farm.
I think no matter what we ever build, or make, or grow – the farm will always be a work in progress. Mainly because it’s in that very “work” that we find all of the fun! And that is the key! It’s where all of our stories and experiences come from –whether it be mice jumping out to scare Mary, or bats flying from an old barn to terrify me – the fun and memories come from the process – not the finished results.
Sometimes though, it just seems that people worry a little too much about everything. Trying to get it perfect, and working so hard to finish – that they never have fun along the way. Mary and I just don’t subscribe to that theory. You see, at the end of the day – it should be about fun and about keeping it simple – or why do it at all?
10 minutes a day – goes a long way..
If there is one thing we do that I think really helps – it is to work a little at it every day. Not only does it keep it fun – it keeps it manageable. We try to always take 10 minutes a day to work at something on the farm. Whether it’s in the garden, building a new structure or just planning. If it can’t be both of us – then usually at least one of us will work on something. It makes you realize you are always making progress – and so much more fun than trying to kill yourself doing it all at once.
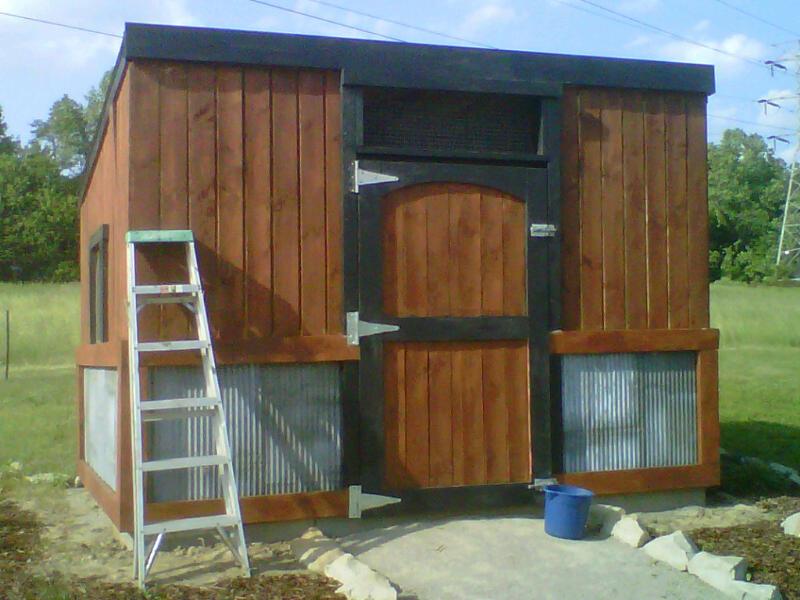
It took awhile to complete – but the “ten minutes a day” theory definitely came in handy on the new coop project.
Quite honestly – I guess the real fun for me is that at the end of every single day, I can say that I am doing something I love to do, with someone I love to do it with. Now that is what I call real fun – whether the darn cucumbers grow next year or not!
Want to learn how to grow garlic, but not sure where to start? This fall is a perfect time to start your first patch. It’s very easy to grow and pest free – you can even use it to make a pest deterrent spray. This fall’s planting will yield green garlic scapes (from hardneck varieties) in late spring and bulbs in mid to late summer.
Where do I Get Garlic to Plant in My Garden? Can I Plant Garlic from the Store?
Store garlic may be treated with sprouting inhibitors to increase shelf life, which could lead to the cloves rotting before they sprout. Store garlic may also have been grown in a very different climate and may not be well adapted for your area. You can plant garlic from the store, it just wouldn’t be my first choice.
The best option for garlic for planting is to get some from a local grower. That way you know you’ll have stock that is adapted to your climate. I got my first bulbs for planting from my friend, Deb, who lives just a few miles down the road from us.
If you can’t find garlic from a local friend or market gardener, or would like to try different varieties, check online or at your local garden center. Fedco Bulbs carries garlic (but they stop shipping at the end of August). Seed Savers Exchange also carries a good assortment of garlic. Southern Seed Exchange also carries softneck, hardneck, Asiatic and Turban and garlic assortments.
What are the Different Types of Garlic?
Hardneck or stiffneck garlic (Allium sativum var. ophioscorodon) has a stiff stem surrounded by a ring of cloves. Stiff neck varieties are often more hardy. I grow a stiff neck type in my northeast Wisconsin garden. Southern Seed Exposure recommends stiffneck types for areas from Virginia northward. Best suited for zones 3-6, some 3-8.
Softneck garlic (Allium sativum var. sativum) has a smaller, flexible central stem, often surrounded by layers of cloves. This is the type that can be braided, and these are also the types that are typically sold in the grocery store. They tend to produce larger yields than hardneck types, but may be less cold hardy. For zones 3-9.
Elephant garlic (Allium ampeloprasum) is not really a garlic at all, but a type of leek. It has a few large cloves and mild flavor that some people like and others do not. My mom grew it once and said she wouldn’t bother doing it again.
How to Plant Garlic
Garlic is planted in fall, typically after first frost has hit but before the soil has frozen completely. I select my biggest garlic bulbs to replant each season. (Eat the smaller bulbs.) Over time this will provide you with your own private stock of garlic that is well adapted to your garden growing conditions.
Soil pH should be neutral to slightly acidic (6-7). Work the planting area thoroughly, digging in some compost or well rotted manure (not fresh manure!), and sprinkling on a light layer of bone meal or other natural fertilizer. If your soil is very light and fluffy, you may be able to stuff the cloves right into the dirt with your bare hands. My preferred method is to dig trenches across the width of the bed, 6 inches apart and 2 – 3 inches deep. I then place individual cloves about six inches apart down the length of the row. Each clove will grow an entire new bulb. (You don’t replant a whole bulb in one spot, just single cloves.) Cover the bulbs with soil and gently tamp down the earth.
Before the ground freezes, cover your garlic patch with a nice thick layer of straw or leaves. This will act as insulation, protecting your bulbs from the freeze/thaw cycle and preventing the frost from heaving the bulbs out of the ground. In spring, you can pull back the mulch to warm the soil and speed growth, and top dress with more compost if you have some available. Little green shoots should start popping up around the same time that other spring bulbs make an appearance.
Once the soil has warmed, I generally put some mulch back in place to keep weeds down and hold in moisture. Garlic doesn’t need much watering unless it is very dry. Less water = more concentrated flavor.
How and When to Harvest Garlic
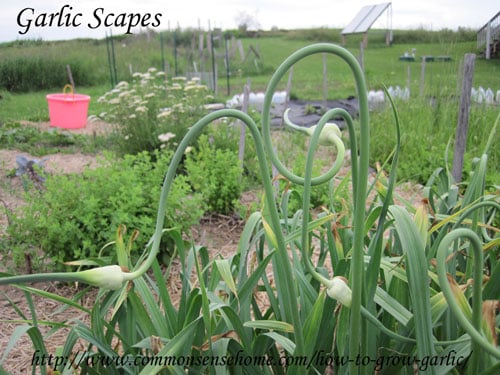
Hardneck garlic will produce flower stalks called scapes in late spring. It’s best to remove these to increase the size of the main bulb. Southern Exposure Seed Exchange states: “For highest yields, remove the scape (or “seed stalk”) at the junction of the highest leaf as soon as the scape has uncoiled from its 360° turn. Each week the scape remains after this stage causes a yield reduction of approximately 5%.” I have noticed in my garden that the scapes I missed did indeed have bulbs that were noticeably smaller in fall.
Once removed, these green scapes can be used to make garlic scape pesto or add garlic flavor to other recipes such as stir fries. You can also let the snipped scapes sit in an out of the way corner and the flower bulbils will mature into miniature garlic bulbs. I like to use these mini-cloves in pickling recipes, such as garlic dill pickles. You can plant the little bulbils, but they will take at least two years to grow into standard size bulbs.
Blend all ingredients in food processor until smooth. Serve over pasta, as a spread, or add to sandwiches for a real garlic punch.
Garlic bulbs should be harvested in late summer when the lower leaves start to turn yellow and/or the tops tip over. If you wait until the tops are entirely brown, the papery covering of the bulbs will get thin and the bulbs are more likely to fall apart in storage instead of staying like nice, attractive bulbs. (Ask me how I know…) They still taste fine, they just don’t look as nice. Around here, we often get fall rains after a dry summer, and that may cause the bulbs to rot, too, if they are left in the ground too long.
Loosen the dirt with a good garden fork and gently lift the bulbs from the ground. Unless your soil is really loose, just trying to pull the bulbs by the stems is likely to leave you with a bulb still in the ground and a handful of stem. (Not that I would ever do this…ahem…)
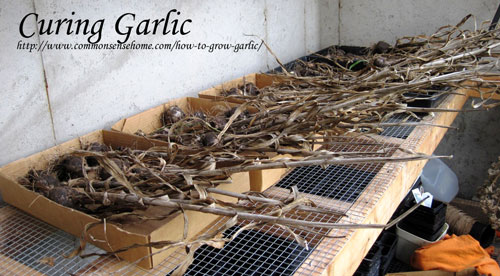
How to Cure Garlic Bulbs
If you want your bulbs to last in storage, you must cure them. Curing is simply the process of removing excess moisture and toughening the outer skin of the bulb. Spread the bulbs in a single layer (stems can crisscross, but don’t stack the bulbs) on a screen in a dry area with good air circulation. I like to spread mine out in my greenhouse and cover them with a piece of burlap. A garage, outbuilding or covered porch may also work well. Avoid large amounts of direct sunlight to prevent sunscald. You probably don’t want to cure them in the house if you can avoid it, as they will be very fragrant.
Let the bulbs cure until the skins are dry and the necks are tight. You want a dry, sturdy little package. Moisture will lead to rot and mold. Once they are dry, brush off loose dirt and outer layers of skin with dirt attached so you have a nice tidy bulb for storage. You can clip the tops and store them in a bin in a cool, dry location out of direct sunlight, or if you have the softneck type you can braid them and put them on display. Remember to safe your biggest bulbs to replant. Don’t send your teenage son to clean bulbs without supervision, lest you find him washing off the dirt in the sink and ruining the curing process. (Thankfully I caught him when he was on his first bulb.) Snip the roots off close to the bulb’s base. Set any damaged bulbs aside to use first. I have kept bulbs in my basement from one season to the next, although by the end they are starting to sprout. Most sources I’ve read suggest that they should easily keep for 3-6 months.
If you need longer storage, garlic may be sliced, dehydrated and ground to make garlic powder, but be warned – it is very fragrant while drying.
How to Braid Garlic
I have never braided garlic, as I only grow the hardneck types, but this video from Gardenerd provides a simple, well demonstrated look at the process.
And there you have it – how to grow garlic from planting to harvest. I hope you’ll follow in the tradition of the pyramid builders and add this fragrant bulb to your garden and your diet.
Our crate and pallet board pieces after disassembling a pallet and a shipping crate
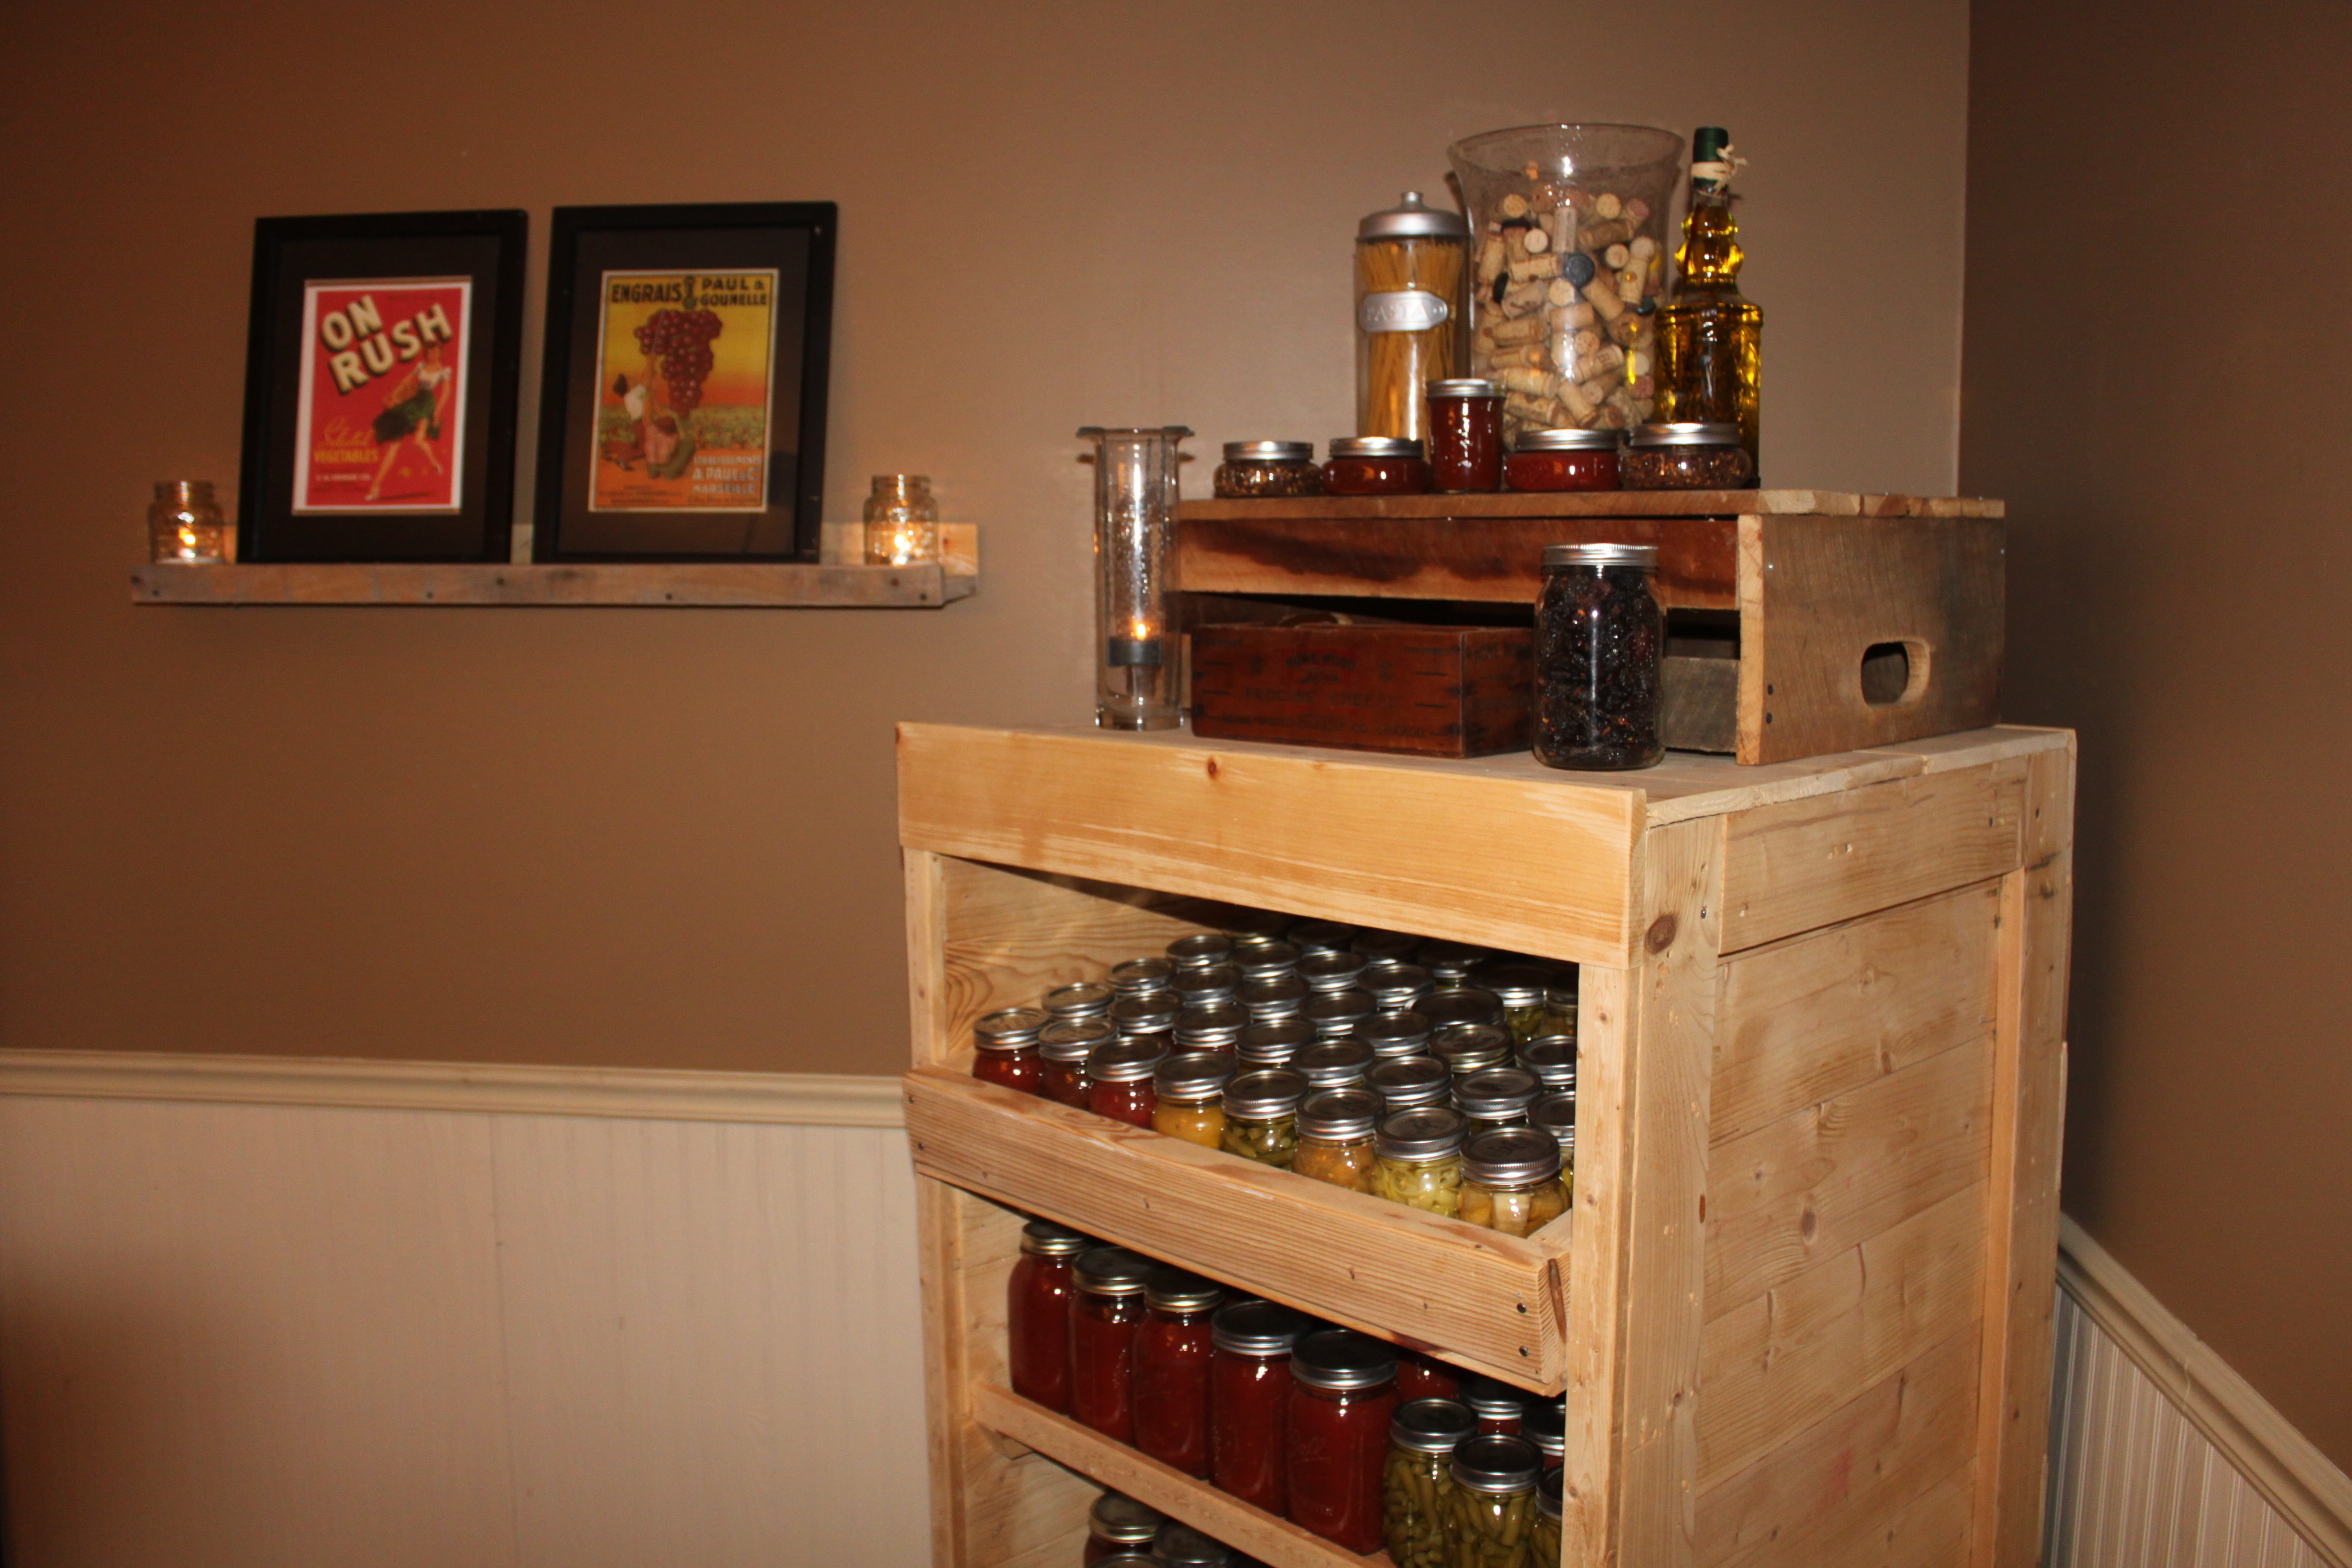
Over the last few months – about every few days we get a comment or two on the canning cabinet or buffet hutch we built out of old shipping crates and pallets. A lot of people want to know how we went about making it. So we thought for today’s post we would go through the how 2′s of building with pallets and shipping crates – with a little extra information on the canning pantry. It’s a great project – with very little cost involved – and lets you store over 200 jars of canned goods!
Our Canning Cabinet made from old pallets and shipping crates. We tilted the top shelf forward a touch for a better display, and added a lip to keep jars from coming off the other shelves.
We have actually made two of them – the first we built from pallets – the second from some old shipping crates and pallets. But for both – the only tools we used were a Sawzall, Nail Gun, Construction Adhesive (liquid nails heavy – duty), 3″ coarse drywall screws and a drill with a Phillips #2 screw bit (for drywall screws)
For the canning cupboard, we started by tearing apart about 4 pallets to use for the sides and shelving boards. We learned early on to not waste time trying to pull the nails from boards and remove every little speck of everything. You end up damaging way too many boards and it takes forever!
Canning pantry shelves are made from pallet boards nailed into 2 x4 frames.
We use a reciprocating saw with a long demolition construction blade and simply slice through the nails. Leave all of the remnant flat nails in the boards, not only does it add lots of character – its super quick. If you place the pallet up on end you can slice through all of the nails in about 15 seconds. Just repeat the process until you have cut them all and you end up with 15 to 25 single boards to work with for every pallet. (depending on pallet size and make-up – you usually get boards about 3 to 5″ wide by 30 to 48″ long). With shipping creates – we just disassemble the sides with the sawzall and then you have ready-made building panels to work with. Whatever you use – pallets, shipping crates or old barn wood – the important thing is to have simple straight boards to build with.
Buffet Hutch made with pallet panels and shipping crate remnants. Same concept – just a little bit bigger than the canning cabinet.
Anytime we make anything with pallets – whether it’s the canning cupboard or the buffet hutch – we will then use the left over 2 x 4′s that make up the pallet’s inside rails to build the carcass structure. They are durable – and although heavy – they are free and make the structure strong. Speaking of the structure – we always use coarse drywall screws and heavy-duty construction adhesive to assemble. The screws hold tight and the adhesive holds forever. Don’t worry about anything other than the framing being straight. Once again if there are some left over bits of nail that have been sawed off smooth – let it be – it just makes for a great patina when stained or painted over.
Side of the cabinet – simple straight pallet boards nailed to a long pallet board makes up a building panel.
Once we have the structures carcass built – we just simply use all of the straight boards cut from the pallets to cover. For this we will use the nail gun for speed and looks – but you could just as easily use a hammer and nails. Once you have trimmed it out to your liking – you can paint, stain or leave natural – and you have a unique conversation piece.
The biggest piece of advice – don’t sweat the details! The biggest mistake people make when using reclaimed lumber or pallets is tot try to make it too perfect. It’s far better to not try to sand everything super smooth - or take out every little crack or dent in the wood. Let them be - it just makes it look that much better.
We do have complete plans for the pantry on our Etsy shop - but whatever you build – the key is to make it yours and have fun with it!